Posts: 5
Threads: 1
Joined: Sep 2022
Reputation:
0
Gimp version:
Operating system(s): Android
Linux
Hi everyone,
someone asked me to remove a person from the background so I did my best. Used clone and healing tools to get rid of the person but still have a bit of a "streaky" effect.
Should I have done something different? Use other tools? or just keep on working on it to smooth things out?
I am not to worried about the reality check under the arm as I had to make the background up.
![[Image: before_removal.jpg]](https://www.jaccoermers.nl/gimp-forum/before_removal.jpg)
![[Image: after_removal.jpg]](https://www.jaccoermers.nl/gimp-forum/after_removal.jpg)
Posts: 7,975
Threads: 170
Joined: Oct 2016
Reputation:
1,090
Gimp version:
Operating system(s): Linux
09-12-2022, 09:23 AM
(This post was last modified: 09-12-2022, 09:34 AM by rich2005.
Edit Reason: typo
)
Quote:I am not to worried about the reality check under the arm as I had to make the background up.
I would still improve that bit, only small but it looks odd, very flat. I would put a vertical edge on it, I think it looks better.
Then it all depends on who knows the room. That light strip of blind, not that important. A bit of smudging on the column shadow. Otherwise, zoom in at a pixel level and go round the edges, clone and smudge.

Posts: 5
Threads: 1
Joined: Sep 2022
Reputation:
0
Gimp version:
Operating system(s): Android
Linux
(09-12-2022, 09:23 AM)rich2005 Wrote: Quote:I am not to worried about the reality check under the arm as I had to make the background up.
I would still improve that bit, only small but it looks odd, very flat. I would put a vertical edge on it, I think it looks better.
Then it all depends on who knows the room. That light strip of wall paneling, not that important. A bit of smudging on the column shadow. Otherwise, zoom in at a pixel level and go round the edges, clone and smudge.
Yes, I was wondering about that light panel. The room reality is not a big issue but will rework that but. Was just wondering if I was using the correct tool or not. Clone and smudge it is.
Any tips on type of brush? Hard? Soft etc?
Posts: 175
Threads: 16
Joined: Sep 2021
Reputation:
7
Gimp version:
Operating system(s): Windows Vista or 7, 8, 10 (64-bit)
It looks good to me. For that level of detail around the shirt I usually start with free select. First I would copy a small bit of the column to the clipboard. Then I would trace the area I want to remove. Then using bucket fill with pattern selected fill with the clipboard. Then perhaps some gaussian blur to even out the color. Then I would follow up with the healing brush.
For that area under the arm. With free Select I would trace the area representing the additional column. Then with move selected ctrl alt move the selection to the part of the column I want to copy. Then copy, then undo, then paste (ctrl c ctrl z ctrl v).
Or better yet I would first trace the entire area with free select. Then ctrl alt move then ctrl c ctrl z ctrl v.
Posts: 5
Threads: 1
Joined: Sep 2022
Reputation:
0
Gimp version:
Operating system(s): Android
Linux
(09-12-2022, 09:37 AM)zeuspaul Wrote: It looks good to me. For that level of detail around the shirt I usually start with free select. First I would copy a small bit of the column to the clipboard. Then I would trace the area I want to remove. Then using bucket fill with pattern selected fill with the clipboard. Then perhaps some gaussian blur to even out the color. Then I would follow up with the healing brush.
For that area under the arm. With free Select I would trace the area representing the additional column. Then with move selected ctrl alt move the selection to the part of the column I want to copy. Then copy, then undo, then paste (ctrl c ctrl z ctrl v).
Or better yet I would first trace the entire area with free select. Then ctrl alt move then ctrl c ctrl z ctrl v.
Thamk you so much for taking the time to try and teach a Newby. If I have a bit of time I will try this technique.
Will post my final result once done
Posts: 175
Threads: 16
Joined: Sep 2021
Reputation:
7
Gimp version:
Operating system(s): Windows Vista or 7, 8, 10 (64-bit)
As an alternative to smudge you can use Gaussian Blur. With Free Select trace a narrow selection along a join edge and then apply a small amount of the blur.
Posts: 175
Threads: 16
Joined: Sep 2021
Reputation:
7
Gimp version:
Operating system(s): Windows Vista or 7, 8, 10 (64-bit)
Using copy and paste can get a little tricky. Sometimes strange things happen and I have to start again. You usually (always?) end up with a floating layer. The floating layer can be adjusted. Use the color curves to darken or lighten to match the destination. Or scale or rotate. Then convert it to a layer and make multiple copies or just merge it.
Sometimes I use it to start with what I want to copy and then move it to the destination and then adjust it. Or start at the destination and then move to what I want to copy and then move it back using undo. Starting at the destination has the advantage of getting a precise trace.
You have to use ctrl alt to move just the selection.
Posts: 1,538
Threads: 71
Joined: May 2021
Reputation:
168
Gimp version:
Operating system(s): Linux
09-13-2022, 08:20 AM
(This post was last modified: 09-13-2022, 08:50 AM by PixLab.)
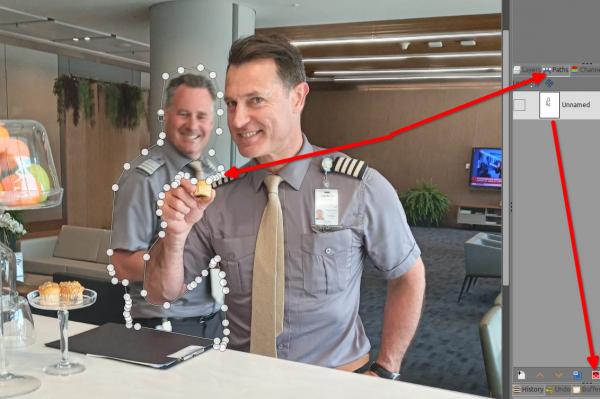
I would have selected the part to remove, with a path for example, then use Selection > From Path just to be sure to have a safe zone when you want to clone or copy/paste
We can clearly see that you did not have a safe zone or a good delimitation 

Then you can just select some element from the background to insert safely, even resize them, without bleeding nor taking a risk to "touch" your main subject as it will be outside the selection, you can even do your "cloning" if you like to clone or whatever tool you like to use, as you will have a safe area because you cannot draw outside a selection

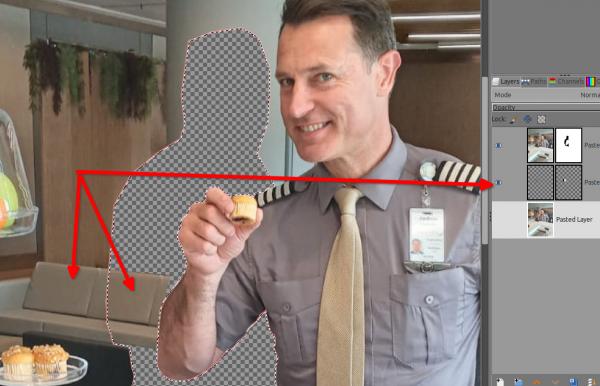
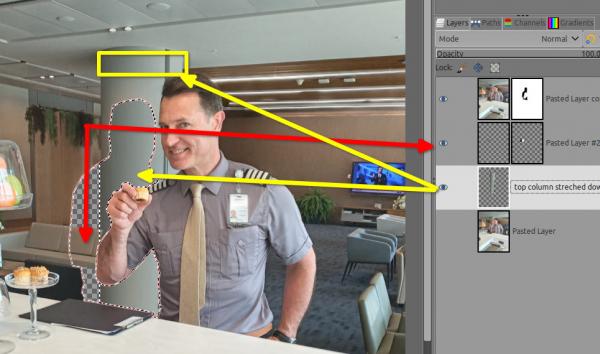
Or just by putting your copy/past below, you can even go faster for example the column, just stretch it until it fill all the way to the bottom (you can do a median blur afterward to smooth things out without bleeding, (same for the wooden wall, take an horizontal sample, copy/paste put it below the sofa in the layer stack, then stretch it downward... and it's almost done)

Posts: 5
Threads: 1
Joined: Sep 2022
Reputation:
0
Gimp version:
Operating system(s): Android
Linux
(09-13-2022, 08:20 AM)PixLab Wrote: I would have selected the part to remove, with a path for example, then use Selection > From Path just to be sure to have a safe zone when you want to clone or copy/paste
We can clearly see that you did not have a safe zone or a good delimitation 
Then you can just select some element from the background to insert safely, even resize them, without bleeding nor taking a risk to "touch" your main subject as it will be outside the selection, you can even do your "cloning" if you like to clone or whatever tool you like to use, as you will have a safe area because you cannot draw outside a selection
Or just by putting your copy/past below, you can even go faster for example the column, just stretch it until it fill all the way to the bottom (you can do a median blur afterward to smooth things out without bleeding, (same for the wooden wall put it below the sofa in the layer stack... and it's almost done)
Wow, I will have to try this way. I actually did start with the safe zone selection around the first step but just used it as a selection at that point.
Posts: 1,538
Threads: 71
Joined: May 2021
Reputation:
168
Gimp version:
Operating system(s): Linux
09-13-2022, 09:17 AM
(This post was last modified: 09-13-2022, 09:22 AM by PixLab.)
(09-13-2022, 08:51 AM)Jaccoermers Wrote: Wow, I will have to try this way. I actually did start with the safe zone selection around the first step but just used it as a selection at that point.
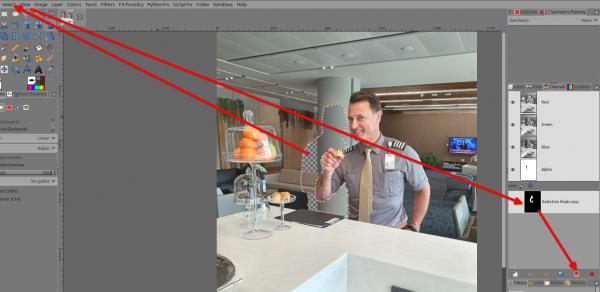
If you start with a selection, you can save your selection to a Channel > go to Select ➤ Save to channel, and get your selection back any time by going to the channel dialog and hit that "To selection"'s button at the bottom of the channel tab (yes you can save as many different selections as you want and even rename them) 

|
![[Image: before_removal.jpg]](https://www.jaccoermers.nl/gimp-forum/before_removal.jpg)
![[Image: after_removal.jpg]](https://www.jaccoermers.nl/gimp-forum/after_removal.jpg)
![[Image: before_removal.jpg]](https://www.jaccoermers.nl/gimp-forum/before_removal.jpg)
![[Image: after_removal.jpg]](https://www.jaccoermers.nl/gimp-forum/after_removal.jpg)


