Posts: 6,851
Threads: 153
Joined: Oct 2016
Reputation:
963
Operating system(s):
Gimp version: 2.10
12-19-2023, 09:43 AM
(This post was last modified: 12-19-2023, 09:50 AM by rich2005.)
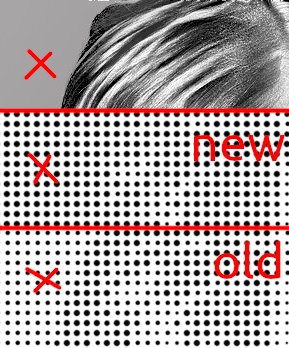
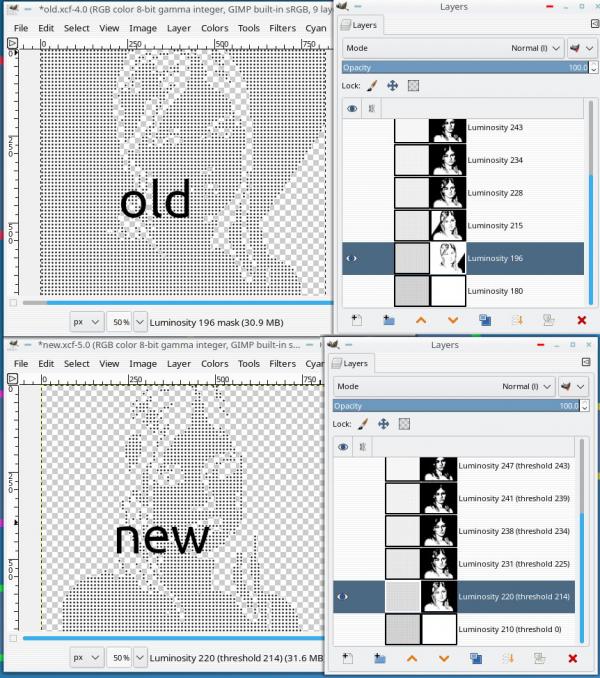
Just a comment, results are ok but not identical between versions.
This using kubuntu 20.04 / Gimp 2.10.36 / same image / same stack of tiles.
New version has lost some of the definition. The background has the same pattern as the adjacent foreground.

Looking at the resulting layers. The mask is inverted ? Well maybe not inverted but not the same ?

Posts: 963
Threads: 77
Joined: Aug 2018
Reputation:
75
Operating system(s):
- Windows (Vista and later)
Gimp version: 2.10
rich2005,
In this comparison, about the old version and the new version (in your previous post), are you referring to the Pixalize plugin versions or the luminosity-tiler versions?
Thx.
.....
Samj Portable - Gimp 2.10.28 - Win-10 /64.
Posts: 6,851
Threads: 153
Joined: Oct 2016
Reputation:
963
Operating system(s):
Gimp version: 2.10
(12-19-2023, 02:11 PM)Krikor Wrote: rich2005,
In this comparison, about the old version and the new version (in your previous post), are you referring to the Pixalize plugin versions or the luminosity-tiler versions?
Old version = the old luminosity-tiler.py + the Gimp 2.8 pixelize plugin
New version = ofn-luminosity-tiler.py that ofnuts posted yesterday {which uses the Gimp 2.10 pixelize filter)
Posts: 963
Threads: 77
Joined: Aug 2018
Reputation:
75
Operating system(s):
- Windows (Vista and later)
Gimp version: 2.10
(12-19-2023, 02:37 PM)rich2005 Wrote: (12-19-2023, 02:11 PM)Krikor Wrote: rich2005,
In this comparison, about the old version and the new version (in your previous post), are you referring to the Pixalize plugin versions or the luminosity-tiler versions?
Old version = the old luminosity-tiler.py + the Gimp 2.8 pixelize plugin
New version = ofn-luminosity-tiler.py that ofnuts posted yesterday {which uses the Gimp 2.10 pixelize filter)
Ohhh, right, I get it.
rich2005 thanks for the answer. 
------------
I downloaded ofn-luminosity-tiler.py and installed it.
However, I kept the luminosity-tiler. Thus, we have two versions of the Ofnuts plugin.
The difference I noticed was that with the new version we have the bonus of the .html file and 10 new tile samples. (in the previous version there were 5).
But in terms of results I didn't notice any change.
I tested with two images and two tile samples, and even after creating a 'visible from' layer of each result and comparing them with the 'Difference' layer mode, I got the image all black, indicating no change.
.....
Samj Portable - Gimp 2.10.28 - Win-10 /64.
Posts: 6,851
Threads: 153
Joined: Oct 2016
Reputation:
963
Operating system(s):
Gimp version: 2.10
Whatever the outcome, it will not be a problem for new users who will use the new working Gimp 2.10 plugin
Posts: 6,022
Threads: 258
Joined: Oct 2016
Reputation:
538
Operating system(s):
Gimp version: 2.10
12-19-2023, 09:54 PM
(This post was last modified: 12-19-2023, 09:56 PM by Ofnuts.)
(12-19-2023, 04:08 PM)rich2005 Wrote: Whatever the outcome, it will not be a problem for new users who will use the new working Gimp 2.10 plugin
The script code is almost unchanged between the two versions, it just adds the image ID as a parameter in the plugin call. So it is probably a matter of the pixelize plugin doing the Right Thing with gamma correction (unlike its ancestor).
If you pixellize an image made of 50/50 black and white pixels:
- In Gimp 2.8, the result is the color (127,127,127) because Gimp computes the average of the pixel values directly, and these are gamma-corrected. And if you look at an area filled with the 50/50 pattern size by side with an area filled with (127,127,127), the color area is noticeably darker.
- In Gimp 2.10, the result is the color (188,188,188) because Gimp
- converts the [0..255] values to linear values: 0.0 and 1.0 , in this case
- computes the average value: 0.5
- applies the gamma correction with a 2.2 gamma: 0.5 ** (1/2.2) = 0.723 (*)
- scales to [0..255].
- And if you do the side-by-side test above on a good display you can hardly tell the difference (it is actually a good way to test your display settings....)
So it looks like I have to review the script to be more faithful in 2.10...
(*) the actual formula is a bit more complex than this
Posts: 6,851
Threads: 153
Joined: Oct 2016
Reputation:
963
Operating system(s):
Gimp version: 2.10
12-20-2023, 08:56 AM
(This post was last modified: 12-20-2023, 09:23 AM by rich2005.)
It might not be worth the effort. Almost certain some pre-processing is needed before applying (any) plugin or filter.
Don't like the result, then back off and do some more pre-processing.
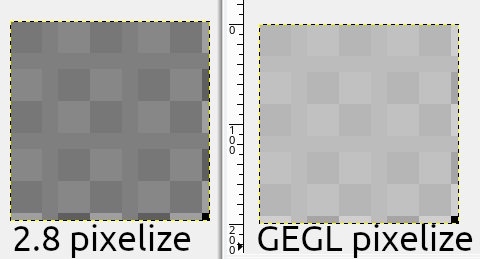
Interesting about the difference in color computation, I had assumed the difference is partially due to the old pixelize compiled plugin versus the re-done GEGL filter. Is pixel size the same as block size ? This a comparison, 16 pixel size and GEGL 16 block size. Both in Gimp 2.10.36
edit: Yes, looks like the difference between RGB 127/127/127 and RGB 188/188/188

One thing that might be worth fixing, layer modes are set to legacy mode. I could not see any difference when changed to default (2.10) mode.
Posts: 6,022
Threads: 258
Joined: Oct 2016
Reputation:
538
Operating system(s):
Gimp version: 2.10
(12-20-2023, 08:56 AM)rich2005 Wrote: It might not be worth the effort. Almost certain some pre-processing is needed before applying (any) plugin or filter.
Don't like the result, then back off and do some more pre-processing.
Of course, but the plugin still could try to have it right the first time. And preprocessing is mostly applying a gamma curve, so the plugin could have a slider for this.
(12-20-2023, 08:56 AM)rich2005 Wrote: Interesting about the difference in color computation, I had assumed the difference is partially due to the old pixelize compiled plugin versus the re-done GEGL filter. Is pixel size the same as block size ? This a comparison, 16 pixel size and GEGL 16 block size. Both in Gimp 2.10.36
I don't really understand what you are showing; I just not that the grid lines are (127,127,127) from the 2.8 plugin and (188,188,188) for GEGL, as I explained.
(12-20-2023, 08:56 AM)rich2005 Wrote: One thing that might be worth fixing, layer modes are set to legacy mode. I could not see any difference when changed to default (2.10) mode.
Doesn't make much difference here, for Normal the difference shows only where there is partial transparency.
Posts: 6,851
Threads: 153
Joined: Oct 2016
Reputation:
963
Operating system(s):
Gimp version: 2.10
The screenshot is just the same image, a black/white checker pattern, duplicated and the old pixelize plugin applied to one and the new GEGL pixelize applied to the other. I have vague memories that this has been raised before (or maybe not)
The legacy mode comment. Only for new users who might be confused by the legacy mode, although it might not even be noticed.
|


