Thread Rating:
  • 0 Vote(s) - 0 Average
  • 1
  • 2
  • 3
  • 4
  • 5
Intro and a few questions on attached photo
#1
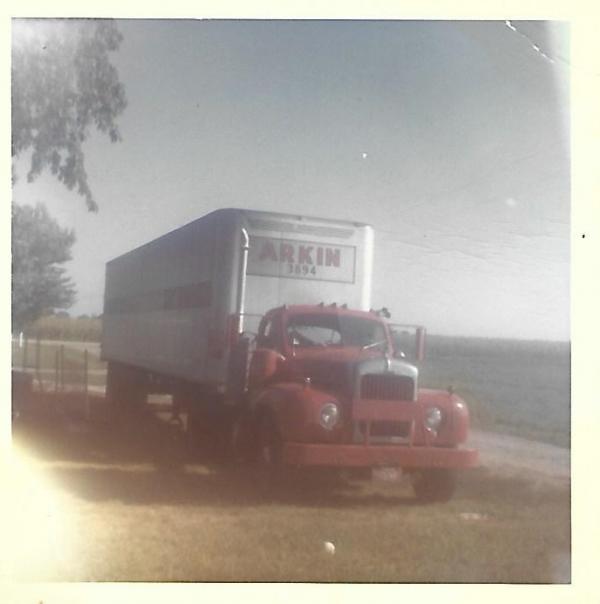
Hello all. I'm a beginner to Gimp and photo editing in general. I've attached a photo that I am trying to restore, and though there are many issues that I need to work on, there are two that I think need to be addressed first. The first, is how to correct the "light flare" in the upper and lower left corners. The second issue, is there any way to bring out more detail in the shadow under the trailer?

   I am using Gimp 2.10.30 with G'MIC-QT version 3.3.4. My operating system is Linux Mint 21.3.

   Currently I'm near completion of  the Udemy course titled "GIMP 2.10 Masterclass: From beginner to pro photo editing". Actually I've finished the training modules and am working my way through the tutorials at the end to gain experience with the UI. Seems to be a good course, but it's emphasis is on design and creation. Sadly, I haven't a creative bone in my body and no interest is creating digital designs. 
   What I do have is several hundred photos from family photo albums taken from the early 1930's to the turn of the century that I want to restore.
   Anyway, enough of my rambling, Any suggestions on coping with the bright spots on the left of the photo and the details in the trailer shadow?
   Thanks in advance!
   
Reply
#2
Before you start on those corners I would dehaze your image and then make sure your colours are correct, Maybe go to colours > levels > auto input levels.or use the equalize local histogram in GMIC- Qt

Then I would clone the bottom left area in. Using 'align' (alignment) so you can get the same differences. You may need to blur parts together with a heal brush after and using the clone tool again make your brush as big as the area on the tree that needs fixing. set your source as part of the tree leaves and the stamp the top left corner.

Smile
Reply
#3
(02-24-2024, 05:07 AM)sallyanne Wrote: Before you start on those corners I would dehaze your image and then make sure your colours are correct, Maybe go to colours > levels > auto input levels.or use the equalize local histogram in GMIC- Qt

Then I would clone the bottom left area in. Using 'align' (alignment) so you can get the same differences. You may need to blur parts together with a heal brush after and using the clone tool again make your brush as big as the area on the tree that needs fixing. set your source as part of the tree leaves and the stamp the top left corner.

Thanks for the tip and the quick response.
   I'm so new at this that I don't even know where to start. 
   As I've worked through the GIMP course I'm taking, I've experimented with most of the tools and filters referenced on a copy of this original .jpg. I think I've made some progress but not enough to call it better. Wink
   I didn't post the .xcf file as it's 255.6 MB and I forgot to check the file size limit for the forum.
   And please excuse my lack of knowledge of the terminology, but, does "dehaze" remove the foggy look? Like the camera lens had a fine coating of dust when the picture was taken
Reply
#4
That's what dehaze does, yes It's in GMIC-Qt under details. You can try and do it just with contrast if it's minor. I tried contrast and it blew out part of the sky.
Dehaze will make your picture darker on default, so you may need to move the sliders a bit so it isn't so strong.
 Edit:      Is this what you are looking to do. I just did a quick mock up after your last question

Smile
Reply
#5
I tried this:
- copy layer and set layer mode 'multiply'
- make new layer : new from visible
- use the Colour / Curves filter to optimise the colors (own taste) on the new layer
- then filter / Enhance (Unsharp Mask)
- then use the clone tool to get rid of the overblown sections
   
Reply
#6
Little done in my editing of the image below:
. Colors - Levels - Auto Input Levels;
. Measure Tool, used to level the image horizontally;
. Clone and Healing tools on the sides to reduce 'light flaire'.

I haven't found a good solution to recover more details from the dark part about the trailer.
Before
[Image: attachment.php?aid=11275]
 
After
   
                               .....
Samj PortableGimp 2.10.28 - Win-10 /64.
Reply
#7
(02-24-2024, 02:19 AM)Danbor Wrote: Hello all. I'm a beginner to Gimp and photo editing in general. I've attached a photo that I am trying to restore, and though there are many issues that I need to work on, there are two that I think need to be addressed first. The first, is how to correct the "light flare" in the upper and lower left corners. The second issue, is there any way to bring out more detail in the shadow under the trailer?

   I am using Gimp 2.10.30 with G'MIC-QT version 3.3.4. My operating system is Linux Mint 21.3.

   Currently I'm near completion of  the Udemy course titled "GIMP 2.10 Masterclass: From beginner to pro photo editing". Actually I've finished the training modules and am working my way through the tutorials at the end to gain experience with the UI. Seems to be a good course, but it's emphasis is on design and creation. Sadly, I haven't a creative bone in my body and no interest is creating digital designs. 
   What I do have is several hundred photos from family photo albums taken from the early 1930's to the turn of the century that I want to restore.
   Anyway, enough of my rambling, Any suggestions on coping with the bright spots on the left of the photo and the details in the trailer shadow?
   Thanks in advance!
Instal Restore2.py
A copy of the layer and its mode (Color LCh), now I click Change active color and use the color picker tool to take a sample of the color that matches the shade of the color in the area.


Attached Files Thumbnail(s)
   
Reply
#8
Wow! So many ways to make improvements. Thank you guys for the tips. Each suggestion has resulted in a better result than what I have spent hours creating. I'll try all of them and see how I do.
Some of these tools and procedures were covered, briefly, in the course I'm taking. However, they were used to create an image and I'm having trouble figuring how to use them to repair rather than create.
Reply
#9
Tried some sharpen and colour tools in G'Mic-Qt , made some blur in the sky : the result :


With the gimp curves tool alone (Colour / Curves) : 
   
Reply
#10
Thanks for the help folks. It will take me a few days to experiment with all of the suggestions while dealing with day to day life. Wink
Reply


Forum Jump: