Posts: 5
Threads: 2
Joined: May 2020
Reputation:
0
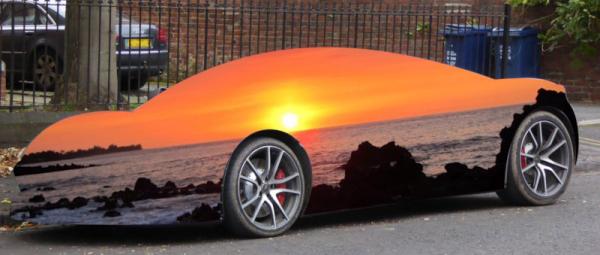
Hi everyone i am learning gimp (2.10.18 Linux version) usage and i have found several tutorials for the basics but not for more complex tasks. For example i have an image A which have car parked on a street and i have another image B which shows a blue caribbean sea. Let's say i select the car from the image A and want to use that car to select and cut or copy a car shaped caribbean sea and copy it in the image A instead of the car so that where originally was the car it would be a sea with the shape of that car. Is there any way to do that? Thanks in advance
Posts: 6,953
Threads: 297
Joined: Oct 2016
Reputation:
605
Gimp version:
Operating system(s): Linux
05-18-2020, 06:36 AM
(This post was last modified: 05-18-2020, 01:37 PM by Ofnuts.)
If the two pictures are layers in the same Gimp image, it's easy because the selection applies to to all layers, so you can use one layer to create a car shaped selection, the activate the other layer, and Edit>Copy will copy the part of the other layer which is in the selection.
If you have two different images it's a bit more complicated because you have to transfer the selection from one image to the other.
If you uses paths to create the selection, with the two images open in Gimp, pick the path in the Paths list of the car image and drag it to the canvas of the sea image, and this will copy it across the images. Then in the sea image, you can adjust the shape (move, scale or else) of the path and then create the selection with Select>From path.
If you didn't use a path, then:
- In the car image: Select>Save to channel, this create a "Selection" channel
- Drag that channel to the canvas of the sea image, where it appears as a new layer
- Make it the only visible layer (shift-click its eye icon)
- In the Channels list, right-click any of the R, G, B channels, and Channel to selection
- You can now remove the copied layer
- You can use the Move/Scale tools in "Selection" mode to adjust the selection mask
Posts: 7,975
Threads: 170
Joined: Oct 2016
Reputation:
1,090
Gimp version:
Operating system(s): Linux
Another way is use a layer mask, There is plenty info on layer mask use, so briefly.
For something like a car with hard edges using making a path is a good way to go, although there are other ways.
Then a selection from path (might need to invert selection) and layer -> mask -> from selection.
examples: https://i.imgur.com/Tr78UOJ.jpg
The background image File -> Open as layers.
Put under the car layer and transform as required. If you keep the path visible, serves as a guide.
examples: https://i.imgur.com/BE4zaWr.jpg

Posts: 5
Threads: 2
Joined: May 2020
Reputation:
0
05-18-2020, 12:12 PM
(This post was last modified: 05-18-2020, 12:33 PM by javitolin.ar.)
(05-18-2020, 06:36 AM)Ofnuts Wrote: If the two pictures are layers in the same Gimp image, it's easy because the selection applies to to all layers, so you can use one layer to create a car shaped selection, the activate the other layer, and Edit>Copy will copy the part of the other layer which is in the selection.
If you have two different image it"s a bit more complicate because you have to transfer the selection from on image to the other.
If you uses paths to create the selection, with the two images open in Gimp, pick the path in the Paths list of the car image and drag it to the canvas of the sea image, and this will copy it across, the images. Then in the sea image, you can adjust the shape (move, scale or else) the path and the create the selection with Select>From path.
If you didn't use a path, then:
- In the car image: Select>Save to channel, this create a "Selection" channel
- Drag that channel to the canvas of the sea image, where it appears as a new layer
- Make it the only visible layer (shift-click its eye icon)
- In the Channels list, right-click any of the R, G, B channels, and Channel to selection
- You can now remove the copied layer
- You can use the Move/Scale tools in "Selection" mode to adjust the selection mask
Excellent, Ofnuts thanks for the detailed tutorial. I will practice that.
(05-18-2020, 07:33 AM)rich2005 Wrote: Another way is use a layer mask, There is plenty info on layer mask use, so briefly.
For something like a car with hard edges using making a path is a good way to go, although there are other ways.
Then a selection from path (might need to invert selection) and layer -> mask -> from selection.
examples: https://i.imgur.com/Tr78UOJ.jpg
The background image File -> Open as layers.
Put under the car layer and transform as required. If you keep the path visible, serves as a guide.
examples: https://i.imgur.com/BE4zaWr.jpg
Wow, that is exactly what i was looking for evidently i was not looking the right words.
Thanks rich. Thanks to both i can learn more of this great program!
|


