I don't know tuto, may be on youtube, I learnt it very long ago (more than a decade) by myself
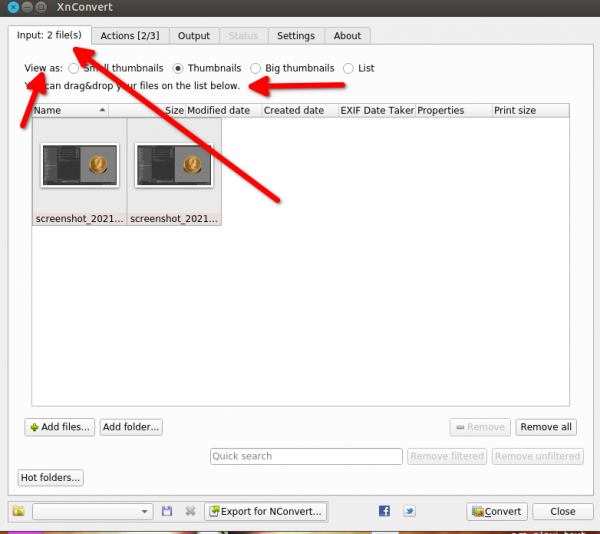
Just drag n drop directories of pictures in it, multiple photos by thousand in it (all at the same time no worries)

Then on the second tab, select action you want to do (a sub menu will open, then even a third menu can open as there are plenty of thing to do)
the action/filter will appear just below with slider, to fine tune, click on the preview button and the tab "After" to visualize what you are doing (Before and After tab)
At the bottom you see those arrows, it for the next photo to preview

Then the third tab "Output"
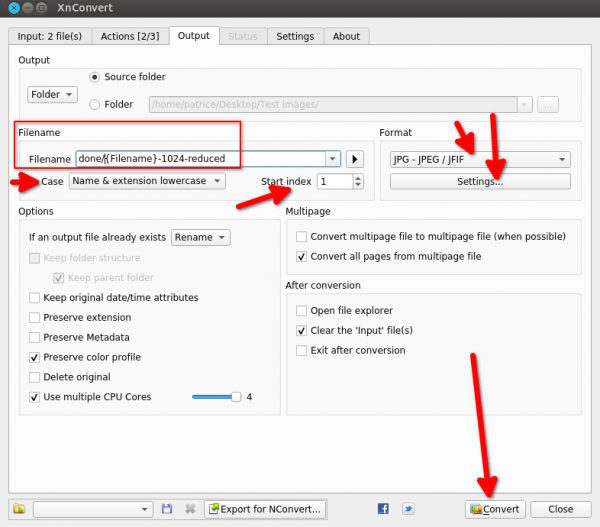
where you want your processed photos to go (which directories), what type of file (for example JPG and it's setting below for quality)
Take a look at the "Filename" on the screenshot done/{Filename}-1024-reduced
I did select as "Output" the "source folder", BUT because I did write in the {filename} done/ ("done" and a forward slash) xnconvert will create a folder done inside each folder/directories I drag n dropped in
{Filename} = keep the original file name, add whatever you want after, or rename, all the name will be the same ➤ but look below it ask at which number the index should start (here it's 1) in case the names are the same (myphoto-1.jpg, myphoto-2.jpg and so)

On the fifth tab "Setting" you have options that xnconvert keep your last used setting when it reopen and another option to keep them and use the latest script / Action
Once you're happy with your setting click Convert in the bottom button
As usual when you don't know a software yet,, don't work straight on original, prepare a directory with sample in it and even sub directories for your firsts tests
I hope you will like it, it's very fast (more than 1 - 1.5 picture per second on my computer with the "Resize" action), but more you add filters/actions a bit longer it will take per picture.
Just drag n drop directories of pictures in it, multiple photos by thousand in it (all at the same time no worries)
Then on the second tab, select action you want to do (a sub menu will open, then even a third menu can open as there are plenty of thing to do)
the action/filter will appear just below with slider, to fine tune, click on the preview button and the tab "After" to visualize what you are doing (Before and After tab)
At the bottom you see those arrows, it for the next photo to preview
Then the third tab "Output"
where you want your processed photos to go (which directories), what type of file (for example JPG and it's setting below for quality)
Take a look at the "Filename" on the screenshot done/{Filename}-1024-reduced
I did select as "Output" the "source folder", BUT because I did write in the {filename} done/ ("done" and a forward slash) xnconvert will create a folder done inside each folder/directories I drag n dropped in
{Filename} = keep the original file name, add whatever you want after, or rename, all the name will be the same ➤ but look below it ask at which number the index should start (here it's 1) in case the names are the same (myphoto-1.jpg, myphoto-2.jpg and so)
On the fifth tab "Setting" you have options that xnconvert keep your last used setting when it reopen and another option to keep them and use the latest script / Action
Once you're happy with your setting click Convert in the bottom button
As usual when you don't know a software yet,, don't work straight on original, prepare a directory with sample in it and even sub directories for your firsts tests

I hope you will like it, it's very fast (more than 1 - 1.5 picture per second on my computer with the "Resize" action), but more you add filters/actions a bit longer it will take per picture.


