Posts: 5
Threads: 1
Joined: Sep 2022
Reputation:
0
Gimp version:
Operating system(s): Android
Linux
(09-13-2022, 08:51 AM)Jaccoermers Wrote: (09-13-2022, 08:20 AM)PixLab Wrote: I would have selected the part to remove, with a path for example, then use Selection > From Path just to be sure to have a safe zone when you want to clone or copy/paste
We can clearly see that you did not have a safe zone or a good delimitation 
Then you can just select some element from the background to insert safely, even resize them, without bleeding nor taking a risk to "touch" your main subject as it will be outside the selection, you can even do your "cloning" if you like to clone or whatever tool you like to use, as you will have a safe area because you cannot draw outside a selection
Or just by putting your copy/past below, you can even go faster for example the column, just stretch it until it fill all the way to the bottom (you can do a median blur afterward to smooth things out without bleeding, (same for the wooden wall put it below the sofa in the layer stack... and it's almost done)
Wow, I will have to try this way. I actually did start with the safe zone selection around the first step but just used it as a selection at that point.
Thank you all for your help. Luckily the guy in the picture is happy with removal of any sort, but I like to make it better and learn in the process. Still not perfect but my result (for now) is under here.
![[Image: new_approach.jpg]](https://www.jaccoermers.nl/gimp-forum/new_approach.jpg)
Posts: 175
Threads: 16
Joined: Sep 2021
Reputation:
7
Gimp version:
Operating system(s): Windows Vista or 7, 8, 10 (64-bit)
PixLab If I create a safezone selection how do I create another selection outside of the safezone? I can clone something from outside the safe zone into the safezone. But when I create a rectangular selection outside the safezone as in your yellow rectangle at the top of the column the safezone selection disappears.
Posts: 1,543
Threads: 73
Joined: May 2021
Reputation:
168
Gimp version:
Operating system(s): Linux
09-15-2022, 03:16 AM
(This post was last modified: 09-15-2022, 03:42 AM by PixLab.)
(09-14-2022, 09:50 PM)zeuspaul Wrote: PixLab If I create a safezone selection how do I create another selection outside of the safezone? I can clone something from outside the safe zone into the safezone. But when I create a rectangular selection outside the safezone as in your yellow rectangle at the top of the column the safezone selection disappears.
Use the "Addition" mode,
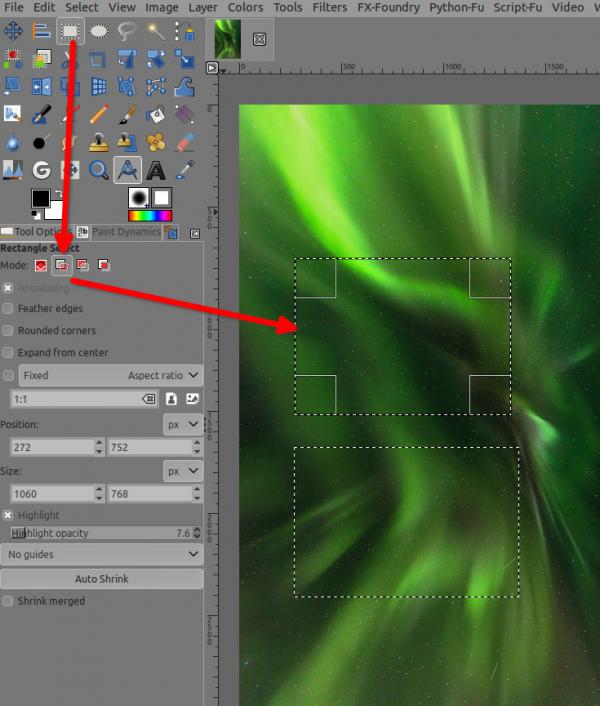
then draw as many different selections as you want
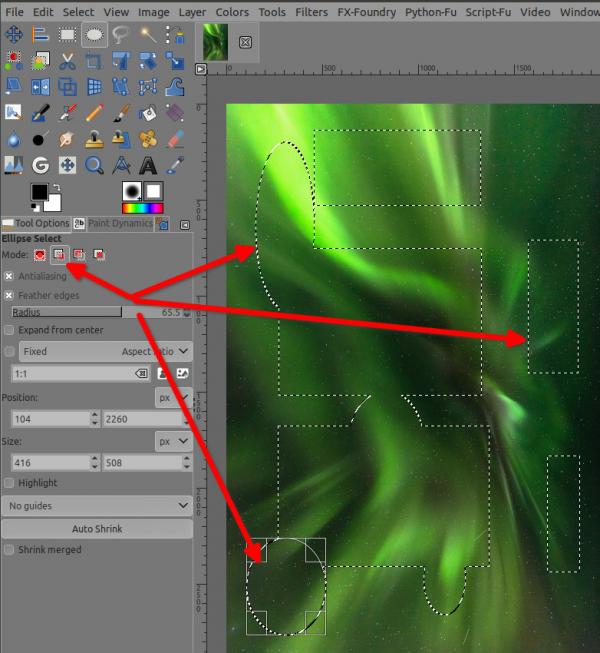
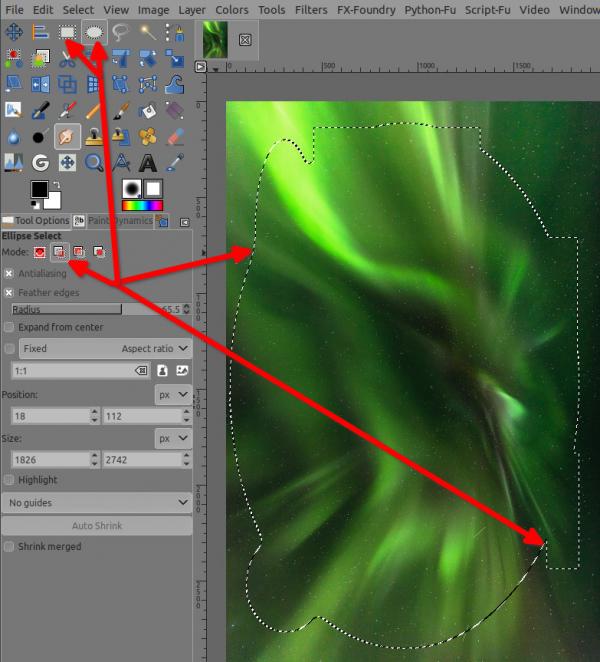
While in Addition mode, you can even fuse them all by double clicking inside one of the selection, the final shape will depend the select tool, the rectangle select tool will make a big rectangle the ellipse select tool will make... see below (no, the double click does not work with the other select tools to fuse, only with rectangle and ellipse  )
Also re-double click inside the fused selection will increase the size of the fused selection
Posts: 175
Threads: 16
Joined: Sep 2021
Reputation:
7
Gimp version:
Operating system(s): Windows Vista or 7, 8, 10 (64-bit)
How do I keep the two selections from moving together? I have the safezone selection and using addition I can create another selection. Then I want to copy-paste it and then move it into the safezone. But when I attempt this both selections move together.
Posts: 1,543
Threads: 73
Joined: May 2021
Reputation:
168
Gimp version:
Operating system(s): Linux
09-15-2022, 05:13 PM
(This post was last modified: 09-15-2022, 05:20 PM by PixLab.)
(09-15-2022, 06:46 AM)zeuspaul Wrote: How do I keep the two selections from moving together? I have the safezone selection and using addition I can create another selection. Then I want to copy-paste it and then move it into the safezone. But when I attempt this both selections move together.
You should have specified this..., I thought you wanted to use the clone tool inside another selection
This is a bit different, but it's safe and fast, safe because of the guides.
Let's start:
Make your first selection, the safe zone, go to Image > Guides > New guides from selection, then use the move tool to move that selection to where you want to copy, Ctrl+C (copy), then use the move tool to move again that selection to the guides in place, then paste ( Ctrl+V)
40 seconds video https://imgur.com/a/S5UneCF
Posts: 175
Threads: 16
Joined: Sep 2021
Reputation:
7
Gimp version:
Operating system(s): Windows Vista or 7, 8, 10 (64-bit)
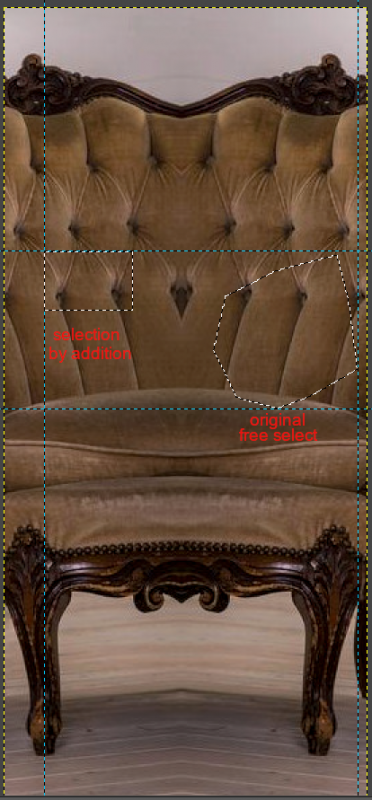
Thanks, using guides I was able to move the entire selection and copy from another location back to the original location. That is basically what I do when moving the original selection to a different location then copy and undo to return to original location. Either way I get the whole thing. If I make the external selection and then use guides I get a selection that includes both.
What I am trying to do is just copy a portion (a piece of the column) of something external to the original selection (freezone) and then copy it and bring it into the freezone and then stretch it like you did.
Posts: 134
Threads: 14
Joined: Jun 2019
Reputation:
22
Gimp version:
Operating system(s): Linux
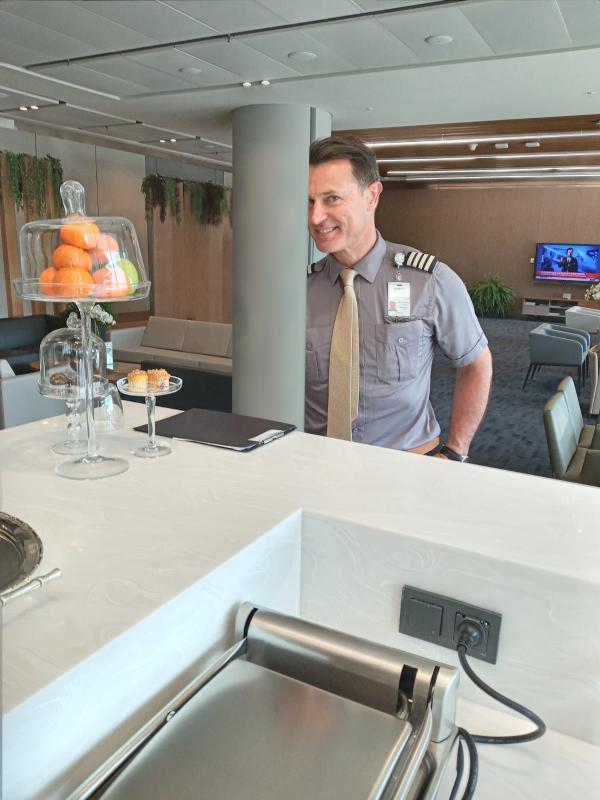
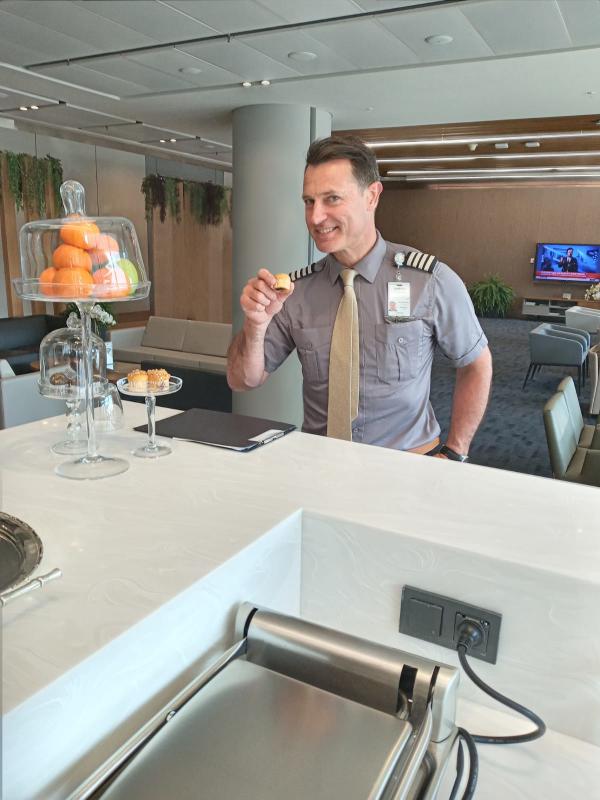
Jaccoermers, I'm late to the party but just in case you are still reading ...
I recommend working without a selection active for the background reconstruction work so you can see the edge details clearly and to reconstruct all the missing background without the main man present.
Attached are my two results the first with the background reconstructed and the second adding the main man back in.
I used several layers, from top to bottom of the layer stack:
Cut out main man, only need to cut out the relevant arm and side accurately.
Reconstructed black area behind desk and folder on desk.
Reconstructed column.
Reconstructed settee.
Reconstructed wall.
Original image.
The lower layers should extend underneath the upper ones by at least a few pixels so that there is the correct background for the anti-aliased edges of the upper layers to be above.
I did the reconstruction by copying and pasting, and using the clone and heal tools as previous posters have already suggested. Also I find it helps to clone/heal on a new transparent layer with the sample merged option selected. That way you can switch the layer visibility on and off to see how your work looks compared to previous layers.
When reconstructing the background, making straight lines with the path tool helps to see where elements extend to.
Also save the .xcf file without flattening it so you can go back and tweak any of the layers later on when you notice the annoying bit you missed, as usually happens to me about 10 seconds after posting 
Posts: 1,543
Threads: 73
Joined: May 2021
Reputation:
168
Gimp version:
Operating system(s): Linux
09-16-2022, 03:51 AM
(This post was last modified: 09-16-2022, 04:07 AM by PixLab.)
Although I did explain this in post #8 & #10 https://www.gimp-forum.net/Thread-Newby-...0#pid31130
I'll give you a step by step with a method you seems to prefer... selections.
Create your safezone with a selection in normal mode (not addition), you can create guides from selection if you wish as a visual reference for later
then go to Select > Save to Channel, the channel tab got in focus and the newly created channel should be selected by default as well, it's called Selection Mask Copy,
then go to Select > None.
then go to Colors > Invert (like that it's ready ready to cut out)
then go back to the layer stack/dialog (layers are all un-selected), thus select/click the layer you want to copy from
make a new selection in normal mode > yes the first selection will disappear, that's ok you saved it to channel
then copy/paste your thing > a floating selection appears in the layer stack, commit it on a new layer ( Layer > To New Layer)
Use the move tool to move than new layer to its new place
use the a transform tool you need to what you need to do
once it's done go to the Channel tab/dialog, right click on Selection Mask Copy a context menu opens, select Channel to Selection
Go back to the layer stack/dialog, click on the layer you have made some transformation, and hit that Delete button
done
Posts: 175
Threads: 16
Joined: Sep 2021
Reputation:
7
Gimp version:
Operating system(s): Windows Vista or 7, 8, 10 (64-bit)
It is not just newbies that benefit. I don't consider myself a newby but I have learned a lot.
|
![[Image: new_approach.jpg]](https://www.jaccoermers.nl/gimp-forum/new_approach.jpg)


