Posts: 12
Threads: 4
Joined: Jan 2021
Reputation:
0
Gimp version:
Operating system(s): Windows Vista or 7, 8, 10 (64-bit)
09-11-2023, 07:05 PM
(This post was last modified: 09-11-2023, 07:51 PM by guest273.)
Hey there!
I just don't have the Vocabulary to do a proper google search since I don't know how this process is called.
Basically:
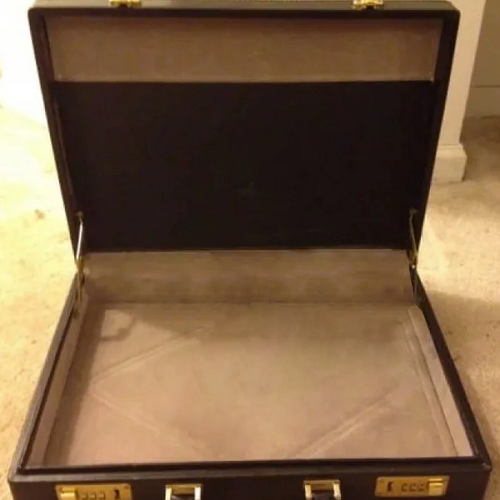
Here (on the left) is the briefcase that they used in the movie Pulp Fiction to make it shine when the character Vincent opens it.
I want to remove the area with the lightbulb & its components and only leave the authentic briefcase.
![[Image: VVGOmzi.png]](https://i.imgur.com/VVGOmzi.png) ![[Image: kbW4bO3.png]](https://i.imgur.com/kbW4bO3.png)
So, I cut out the area with the lightbulb but now how do I "smear" the nearby colors to make the briefcase look naturally empty?
I think that splitting the coloring-in in multiple 'sectors' would make sense - one tone for the 'bottom' of the base, one for the 'right side' of the case and the last for the 'backside'.
In the end I want to use this 500x500 px image in a 1000x1000 4 panel meme that I am making, as I want to place an object 'inside' (over) the brief case. So it doesn't need to look perfect, only decent enough for a person looking at said image for about 3-5 seconds to not notice that the background coloring looks totally whack.
Any help is appreciated! I plan to check back here in a day or two. 
Thank you,
guest273
I want it to look better than the briefcase edits in these pictures:
https://i.imgflip.com/3g8ss8.jpg
https://i.kym-cdn.com/photos/images/news...3/87b.jpeg
https://i.kym-cdn.com/photos/images/news...6/221.jpeg
Posts: 171
Threads: 16
Joined: Sep 2021
Reputation:
7
Gimp version:
Operating system(s): Windows Vista or 7, 8, 10 (64-bit)
I used copy and paste, clone and heal. For the angular join from the backside to the bottom I made a rectangular selection adjacent to the void, then copy and paste to new layer, then horizontal flip the layer and then move into position. Similar on the right side but used free select and then copy paste to new layer, then flip vertical and then arbitrary rotation then move into place. A little free select in a detailed area near the hinge, then copy and paste from an adjacent area. The rest was clone and heal. I am sure there other better methods.

Posts: 1,538
Threads: 71
Joined: May 2021
Reputation:
167
Gimp version:
Operating system(s): Linux
09-12-2023, 04:32 AM
(This post was last modified: 09-12-2023, 04:53 AM by PixLab.)
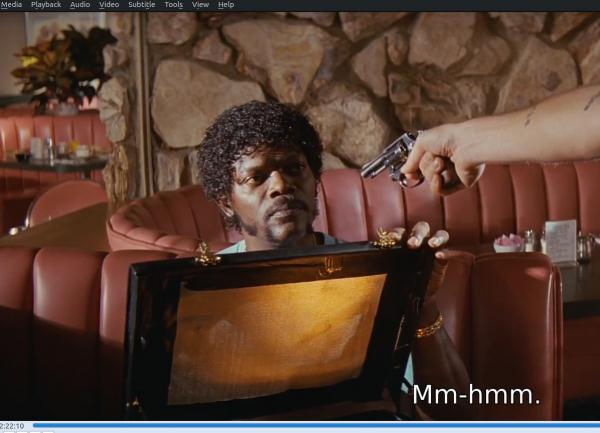
(09-11-2023, 07:05 PM)guest273 Wrote: Here (on the left) is the briefcase that they used in the movie Pulp Fiction to make it shine when the character Vincent opens it.
No it is not that model!
I just did a screenshot > this is the briefcase!

As you can see, it is not the same 
But we do know the brand when Vincent is opening it > it's Franzen, thus you can take any opened briefcase with a golden color inside and without the need to remove lightbulb + material, like here > https://i.ebayimg.com/images/g/JxMAAOSwl...-l1600.jpg 
Or do a search like this > https://www.google.com/search?newwindow=...e&tbm=isch, you will find WAY BETTER quality pictures and nothing to remove inside 
Patrice
Posts: 1,309
Threads: 200
Joined: Sep 2018
Reputation:
124
Gimp version:
Operating system(s): Windows (Vista and later)
(09-11-2023, 11:52 PM)zeuspaul Wrote: I used copy and paste, clone and heal. For the angular join from the backside to the bottom I made a rectangular selection adjacent to the void, then copy and paste to new layer, then horizontal flip the layer and then move into position. Similar on the right side but used free select and then copy paste to new layer, then flip vertical and then arbitrary rotation then move into place. A little free select in a detailed area near the hinge, then copy and paste from an adjacent area. The rest was clone and heal. I am sure there other better methods.
@zeuspaul, in this situations, I would use the same workflow. Nice result.
Posts: 12
Threads: 4
Joined: Jan 2021
Reputation:
0
Gimp version:
Operating system(s): Windows Vista or 7, 8, 10 (64-bit)
Hey there! Good evening gentlemen!
(09-11-2023, 11:52 PM)zeuspaul Wrote: I used copy and paste, clone and heal. For the angular join from the backside to the bottom I made a rectangular selection adjacent to the void, then copy and paste to new layer, then horizontal flip the layer and then move into position. Similar on the right side but used free select and then copy paste to new layer, then flip vertical and then arbitrary rotation then move into place. A little free select in a detailed area near the hinge, then copy and paste from an adjacent area. The rest was clone and heal. I am sure there other better methods.
WOOOOW! This briefcase edit is extremely well done! Thank you! 
I've read the description multiple times now, but things like these I'd really have to see you do in a recording for me to have a chance to at the very least practice by mimicking them.
Your post is much appreciated! 
(09-12-2023, 04:32 AM)PixLab Wrote: (09-11-2023, 07:05 PM)guest273 Wrote: Here (on the left) is the briefcase that they used in the movie Pulp Fiction to make it shine when the character Vincent opens it.
No it is not that model!
I just did a screenshot > this is the briefcase!
As you can see, it is not the same 
But we do know the brand when Vincent is opening it > it's Franzen, thus you can take any opened briefcase with a golden color inside and without the need to remove lightbulb + material, like here > https://i.ebayimg.com/images/g/JxMAAOSwl...-l1600.jpg 
Or do a search like this > https://www.google.com/search?newwindow=...e&tbm=isch, you will find WAY BETTER quality pictures and nothing to remove inside 
Well... now.
I was pretty sure that they used the briefcase in the original picture which I posted but I guess that it's just a bogus myth then. 
I'm thinking now whether or not to actually use the image I had planned. It's already the correct side and I'm sure that I'm not the only one who though that it's the actual briefcase which was used in the movie...
The object which I want to place inside of the briefcase is of low resolution, so a HD case would maybe be a mismatch... I'll consider my options.
Thanks for your input.
Posts: 1,538
Threads: 71
Joined: May 2021
Reputation:
167
Gimp version:
Operating system(s): Linux
(09-13-2023, 06:47 PM)guest273 Wrote: Well... now.
I was pretty sure that they used the briefcase in the original picture which I posted but I guess that it's just a bogus myth then. 
I'm thinking now whether or not to actually use the image I had planned. It's already the correct side and I'm sure that I'm not the only one who though that it's the actual briefcase which was used in the movie...
The object which I want to place inside of the briefcase is of low resolution, so a HD case would maybe be a mismatch... I'll consider my options.
Thanks for your input.
The original briefcase has to be black inside, for the movie to control the light... with some reflector > https://www.google.com/search?newwindow=...=lnms&sa=X
Movie's maker want an absolute control of the light, no noise, no parasite, thus it can't be the original briefcase.
The picture you're showing us does not make any sense from a photography point of view, and it's just placed on a floor to take a picture of it?.... 
That might be a person which did show a bit of a DIY to show how the glowing effect was made, but it is not the original briefcase 
Patrice
Posts: 12
Threads: 4
Joined: Jan 2021
Reputation:
0
Gimp version:
Operating system(s): Windows Vista or 7, 8, 10 (64-bit)
 09-17-2023, 04:28 PM
(This post was last modified: 09-17-2023, 04:29 PM by guest273.)
Okay, so here's the final product:
Once again BIG THANKS to zeuspaul for helping me out with making an awesome 2nd panel! 
![[Image: I02jOhZ.png]](https://i.imgur.com/I02jOhZ.png)
I roughly based my design on this:
![[Image: ACvgvRF.jpg]](https://i.imgur.com/ACvgvRF.jpg) ((( If you care for semi regular memes you can visit my Reddit page: https://www.reddit.com/user/guest_273/ )))
((( If you care for semi regular memes you can visit my Reddit page: https://www.reddit.com/user/guest_273/ )))
Anyway, here's a quick joke explanation to the GIMP community:
The game referenced is HoMM3 (Heroes of Might and Magic III). There are different factions and different Heroes in the game. Dace is a Minotaur specialist hero. We can see Dace in the 1st panel has just seen something shiny in a briefcase. Dace responds to the Minotaur that they are happy with what they see. In the 4th panel we see a really unhappy army where everyone has mis-moraled (skipped their turn to move / act) except the Skeleton and the Minotaur. Long story short: The Minotaur's special ability is that their minimum morale is always +1. The Skeletons are undead hence they are not affected by morale, but since every of the other units is from a different faction plus they have a skelly boy in the same army their morale is shattered. Like actually -3 total (which is the cap), it gives each of them a 25% chance to skip their turn. Now of course I gave all of them the negative morale animation in a slighly different stage of the animation for comedic effect.
Oh, quick edit: The Artifact in the briefcase is supposed to give the whole army +1 morale, but yeah, it would still be -3 negative.
- guest273 (signing off for now).
|
![[Image: VVGOmzi.png]](https://i.imgur.com/VVGOmzi.png)
![[Image: kbW4bO3.png]](https://i.imgur.com/kbW4bO3.png)

![[Image: VVGOmzi.png]](https://i.imgur.com/VVGOmzi.png)
![[Image: kbW4bO3.png]](https://i.imgur.com/kbW4bO3.png)


![[Image: I02jOhZ.png]](https://i.imgur.com/I02jOhZ.png)
![[Image: ACvgvRF.jpg]](https://i.imgur.com/ACvgvRF.jpg)