Thread Rating:
  • 0 Vote(s) - 0 Average
  • 1
  • 2
  • 3
  • 4
  • 5
How to write Chinese 2
#1
In my first post you helped me figuring out how to do the character writing square. Now it is time to add characters and I am facing several roadblocks.

I am using GIMP on an Mac M2 Air, so that might be a reason for the first problem.
1) I have fonts available in Microsoft Word that are not available in GIMP. The fonts I want to use are listed after Wingdings in Word (which is not where they should be alphabetically listed). I am planning on using either BiauKaiTC or Kaiti TC. 
How do I get these fonts to be available in GIMP?

2) I want the character to be drawn with a black edge only. How do I do that?

3) I want to fill the strokes of the characters that are being drawn at that step. It is a problem to just use the filler when the a part is directly connected to the first part, but not to be drawn before the next step. How do I put a "block" on where the filler can fill up to?

4) How can I make thin lines with arrows to show where to start, turn and end the stroke?


I am attaching a picture that gives an idea of problem 2) and 3). I want a different approach, because I want the arrows as well. I hope the picture explains some of the complications.
   
Reply
#2
(08-05-2023, 09:56 AM)renemolbo Wrote: In my first post you helped me figuring out how to do the character writing square. Now it is time to add characters and I am facing several roadblocks.

I am using GIMP on an Mac M2 Air, so that might be a reason for the first problem.
1) I have fonts available in Microsoft Word that are not available in GIMP. The fonts I want to use are listed after Wingdings in Word (which is not where they should be alphabetically listed). I am planning on using either BiauKaiTC or Kaiti TC. 
How do I get these fonts to be available in GIMP?

2) I want the character to be drawn with a black edge only. How do I do that?

3) I want to fill the strokes of the characters that are being drawn at that step. It is a problem to just use the filler when the a part is directly connected to the first part, but not to be drawn before the next step. How do I put a "block" on where the filler can fill up to?

4) How can I make thin lines with arrows to show where to start, turn and end the stroke?


I am attaching a picture that gives an idea of problem 2) and 3). I want a different approach, because I want the arrows as well. I hope the picture explains some of the complications.

  1. Can you locale the font files? Gimp takes TTF and OTF
  2. Create the character in a text layer, Layer > Text to path, then on a new layer Edit > Stroke path in Line` mode (and hide the initial text layer)
  3. Many solutions, but a rather immediate one is to copy the filled area from the initial text layer. Changing the color is easy using alpha-lock and painting.
  4. There are several scripts to draw arrows, but perhaps you could show an example of the arrows you want.
Reply
#3
To add to Ofnuts post:

You put your font, the one I just downloaded is BiauKai.ttf in your Gimp fonts folder. Do you know where that is ?


You need to open the Gimp preferences and in MacOS I think that is in the first tab "Gimp", look for Folders > Fonts and the path to the fonts folder is shown. It might be something like /Users/MyName/Library/Application Support/Gimp/2.10/fonts, but might be different depending on MacOS version.  This is my linux preferences.

-----------------
Just throwing this in as a possible. It depends what shows.  If you get the Chinese Characters shown, great. With my linux installation I either get european characters (1) or code symbols. For this screenshot I get round that by making my own font (2) using Fontforge font editor (a quick copy-paste exercise). 

Once you have your character showing (3), then it is the same for any font.
(4) Layer -> Text to Path and in a new layer Edit -> Stroke Path
(5) If you are careful, paint in parts of the character after Select -> From Path

   
Reply
#4
Wonderful help!
Within a few minutes I had the first few steps working.
1) Turned out that Microsoft Word stores fonts in its own application library. So I found the font I wanted and put it in the global library, now GIMP has access to it as well.
2) Super simple and I would never have guessed that approach. 
3) I have done the following and run into a few problems.
I am posting 3 pictures to explain what I am doing and what my problem is.

   
I have the character with the black edge - looks wonderful!

   
I used the paths tool to make a block in the 亻's top part from the upright part. I figured that the paths tool would give me the best fitting line and that seemed to be the case.

   
Here is the problem. I used bucket fill tool and I now have 3 colours. Red inside with a white brim and black edge. 
How do I get rid of the white brim?
How do I paint the black edge red? I only want the top part painted red in the first step.

(08-05-2023, 11:40 AM)Ofnuts Wrote:
(08-05-2023, 09:56 AM)renemolbo Wrote: In my first post you helped me figuring out how to do the character writing square. Now it is time to add characters and I am facing several roadblocks.

I am using GIMP on an Mac M2 Air, so that might be a reason for the first problem.
1) I have fonts available in Microsoft Word that are not available in GIMP. The fonts I want to use are listed after Wingdings in Word (which is not where they should be alphabetically listed). I am planning on using either BiauKaiTC or Kaiti TC. 
How do I get these fonts to be available in GIMP?

2) I want the character to be drawn with a black edge only. How do I do that?

3) I want to fill the strokes of the characters that are being drawn at that step. It is a problem to just use the filler when the a part is directly connected to the first part, but not to be drawn before the next step. How do I put a "block" on where the filler can fill up to?

4) How can I make thin lines with arrows to show where to start, turn and end the stroke?


I am attaching a picture that gives an idea of problem 2) and 3). I want a different approach, because I want the arrows as well. I hope the picture explains some of the complications.

  1. Can you locale the font files? Gimp takes TTF and OTF
  2. Create the character in a text layer, Layer > Text to path, then on a new layer Edit > Stroke path in Line` mode (and hide the initial text layer)
  3. Many solutions, but a rather immediate one is to copy the filled area from the initial text layer. Changing the color is easy using alpha-lock and painting.
  4. There are several scripts to draw arrows, but perhaps you could show an example of the arrows you want.

Thank you for points 1-3. As you can see from my post below I am still working on point 3, but 1-3 have been very helpful.

Regarding 4 I have inserted a picture. The arrows/lines seem drawn by hand, but it still gives an idea of the problem. The lines are not straight lines. And you have to start from a certain point. But stroke 4 has a twist. You go right and then turn down in one stroke. If the number started the line and the arrowhead finished the line then I think it would probably be the most ideal. But as you can see from this character some strokes start in very crammed places (compare 1 and 4) so the size of the numbers would have to be adjustable.
 
[Image: 4f60-number.png]
Reply
#5
Usual problem with anti-aliasing pixels on the edge of things. The bucket tool fill has a "fill by line art detection" that works fine very often. Otherwise, if the outline is on a transparent layer, fuzzy select the transparency, Select ➤ grow  by 2px to have the selection cover the edge pixels, and bucket-fill in Behind mode. You can also use Behind mode with the paint brush (and this can be faster, since you don' t need to be extra-accurate, the Behind mode will "protect" the lines).


Some more info on anti-aliasing pixels and handling them properly here.
Reply
#6
Great help Ofnuts! Really appreciate it.

I have made some progress now. But I still have problems and questions.
Let me first of all show you what I have been able to do.


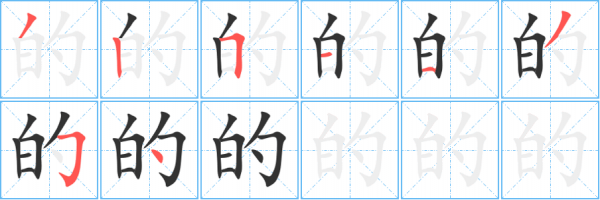
From these pictures you can see how the stroke order is to be done. It works pretty well and the speed at which I am able to do it is also pretty good.

Now my question is
How can I add lines? It is important that people can see where to start and how much to do in one stroke.
Reply
#7
(08-12-2023, 10:33 AM)renemolbo Wrote: Great help Ofnuts! Really appreciate it.

I have made some progress now. But I still have problems and questions.
Let me first of all show you what I have been able to do.

From these pictures you can see how the stroke order is to be done. It works pretty well and the speed at which I am able to do it is also pretty good.

Now my question is
How can I add lines? It is important that people can see where to start and how much to do in one stroke.

I would use path, then stroke the path with dashed lines

3 minutes minute video https://youtu.be/XgI2yDiO2nw

Then I will make the tip of the arrow on a separate image or layer in black and white, then select all, then copy, the action of copy (Ctrl+C) -> it become a clipboard brush -> choose the clipboard mask to be able to use the color from the foreground color and play with the angle of the brush

2 minutes and 30 seconds video https://youtu.be/fCXz97WzgNw

But somewhere someone , I'm sure, has a script to draw arrows along a path, which will be a piece of cake to do arrows
Patrice
Reply


Forum Jump: