Posts: 20
Threads: 6
Joined: Feb 2019
Reputation:
1
Gimp version:
Operating system(s): Windows (Vista and later)
(08-10-2025, 05:34 PM)Ofnuts Wrote: You don't need a "mask" (or at least not the "mask" concept as understood in Gimp). .There are plenty of tools to shift colors slightly.
* Colors > Color temperature an increase the intended temperature slightly (this is a prime candidate if you have two image that are likely two photos of the same source, but taken with a slightly different white balance)
* Colors > Hue chroma and slightly reduce the hue
* Colors > Hue saturation
The ultimate tool for this is a CLUT, using the GMIC plugin. Using the before and after images it will produce a Color Look-Up Table (CLUT) that maps the colors between the two images. With the same plugin you can re-apply the CLUT to a different image to obtain the same result (in theory, in practice you can only apply it to a similar image, a CLUT created using an image with plenty of reds may not give good results on an image with plenty of blues.
I tried the CLUT filter (Colors/CLUT before - after layers) and so it says that I need to layers to run the filter. So I just simply duplicated the layer which gave me two layers but the filter still wouldn't run. All I'm trying to do is make a color look up table of my preferred image and apply it to my uncropped high res image.
Posts: 6,942
Threads: 297
Joined: Oct 2016
Reputation:
605
Gimp version:
Operating system(s): Linux
Yes, GMIC is a bit fiddly. You can tell it to use All layers, but first and foremost, you need to have two identical image that only differ by the colors. And the images you show haven't even got the sale size. So your first task is to use the Unified Transform tool to make them overlap, and then crop the image to some common part. Then you can use GMIC, asking it to create a new layer, and it will create this:
As a test, reapply the CLUT to the first image, and you get this:
Posts: 7,829
Threads: 166
Joined: Oct 2016
Reputation:
1,078
Gimp version:
Operating system(s): Linux
(08-13-2025, 11:55 PM)AceMcHammer Wrote: ried the CLUT filter (Colors/CLUT before - after layers) and so it says that I need to layers to run the filter. So I just simply duplicated the layer which gave me two layers but the filter still wouldn't run. All I'm trying to do is make a color look up table of my preferred image and apply it to my uncropped high res image
A bit more about the gmic cubic look-up table (CLUT) filter

As it states you need two images one before and one after. Unfortunately your small before / after images you posted are not geometrically identical, so you will have to do a bit of image matching. Once you have done that and using gmic
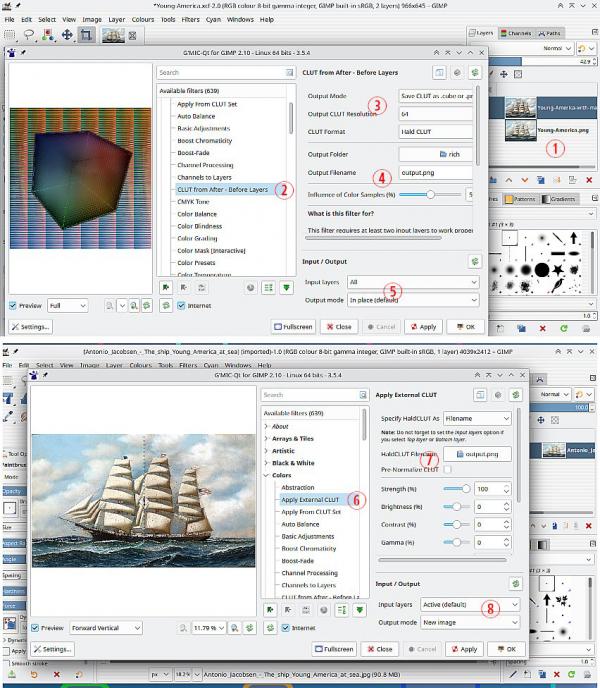
(1) The two layers
(2) CLUT from before after
(3) Set the output mode
(4) Give the generated CLUT a name
(5) Set input layers to All
Ok that and it makes the CLUT
Now in your large image and gmic
(6) Apply External CLUT
(7) Find the CLUT just created
(8) Always a good idea to output a new file, just in case you screwed up.
Posts: 1,390
Threads: 211
Joined: Sep 2018
Reputation:
129
Gimp version:
Operating system(s): Windows 11
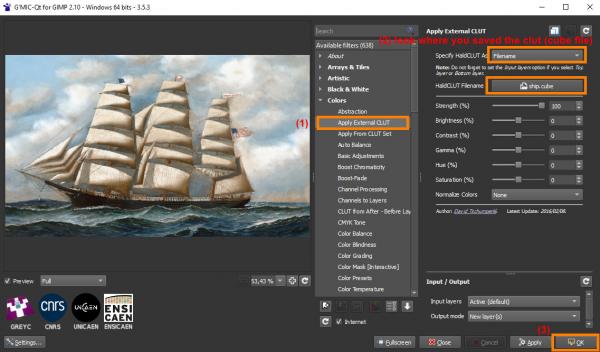
That should be the clut:
 ship.zip
 (Size: 832.68 KB / Downloads: 76)
Unzip the file (and remember where you unzipped the file).
Then use G'Mic-Qt

Posts: 20
Threads: 6
Joined: Feb 2019
Reputation:
1
Gimp version:
Operating system(s): Windows (Vista and later)
08-14-2025, 09:56 PM
(This post was last modified: 08-14-2025, 10:06 PM by AceMcHammer.)
(08-14-2025, 12:04 PM)denzjos Wrote: That should be the clut:
Unzip the file (and remember where you unzipped the file).
Then use G'Mic-Qt
Thanks man! That's great!
We're on to something now. However I applied the clut (ship.cube) and it came out like this.. I assume it came out like this because I applied the clut to my un-cropped (and high res) image. The size ratio of the two images are different...
this image is scaled down for posting here but you can see it's got problems...
![[Image: Young-America-High-Res-clut-applied.png]](https://i.postimg.cc/nhTq7GTW/Young-America-High-Res-clut-applied.png)
(08-14-2025, 07:13 AM)Ofnuts Wrote: Yes, GMIC is a bit fiddly. You can tell it to use All layers, but first and foremost, you need to have two identical image that only differ by the colors. And the images you show haven't even got the sale size. So your first task is to use the Unified Transform tool to make them overlap, and then crop the image to some common part. Then you can use GMIC, asking it to create a new layer, and it will create this:
As a test, reapply the CLUT to the first image, and you get this:
Dude, that is practically on the money. All I gotta do is figure out how to get the clut applied properly to my uncropped high res image. I thought about creating extra canvas space to the preferred (but cropped) image to match the ratio size of my uncropped image but all that would do is add two giant bars worth of white to the clut.
(08-14-2025, 07:25 AM)rich2005 Wrote: (08-13-2025, 11:55 PM)AceMcHammer Wrote: ried the CLUT filter (Colors/CLUT before - after layers) and so it says that I need to layers to run the filter. So I just simply duplicated the layer which gave me two layers but the filter still wouldn't run. All I'm trying to do is make a color look up table of my preferred image and apply it to my uncropped high res image
A bit more about the gmic cubic look-up table (CLUT) filter
As it states you need two images one before and one after. Unfortunately your small before / after images you posted are not geometrically identical, so you will have to do a bit of image matching. Once you have done that and using gmic
(1) The two layers
(2) CLUT from before after
(3) Set the output mode
(4) Give the generated CLUT a name
(5) Set input layers to All
Ok that and it makes the CLUT
Now in your large image and gmic
(6) Apply External CLUT
(7) Find the CLUT just created
(8) Always a good idea to output a new file, just in case you screwed up.
Thanks man. Those details are extremely helpful
Posts: 1,390
Threads: 211
Joined: Sep 2018
Reputation:
129
Gimp version:
Operating system(s): Windows 11
Over the years the same difficult problem has come up here on this forum. Here are some of the possible solutions:
1 - Try this with the two photos : https://github.com/samrocketman/home/blo..._match.scm (script)
Channels to use : 'LAB - Preserve Luma' or 'YCbCr - Preserve luma'
2 - https://patdavid.net/2012/07/getting-aro...more-color
3 - You can try this : GMIC-Qt / Colors / Transfer Colors (PCA)
4 - https://www.dustfreesolutions.com/CT/CT.html
Posts: 20
Threads: 6
Joined: Feb 2019
Reputation:
1
Gimp version:
Operating system(s): Windows (Vista and later)
08-15-2025, 10:30 PM
(This post was last modified: 08-15-2025, 10:33 PM by AceMcHammer.)
(08-15-2025, 06:44 AM)denzjos Wrote: Over the years the same difficult problem has come up here on this forum. Here are some of the possible solutions:
1 - Try this with the two photos : https://github.com/samrocketman/home/blo..._match.scm (script)
Channels to use : 'LAB - Preserve Luma' or 'YCbCr - Preserve luma'
2 - https://patdavid.net/2012/07/getting-aro...more-color
3 - You can try this : GMIC-Qt / Colors / Transfer Colors (PCA)
4 - https://www.dustfreesolutions.com/CT/CT.html
I tried a couple things. First I figured out the aspect ratio of my high res image of pixel length and width and added canvas size to my preferred image to match the aspect ratio of my high res image. I then copied selections from the colored areas of the image and pasted them into the blank sections of the new canvas area in an attempt to fool the filter into just coming up with something other than white in those side sections of the canvas. I then upscaled the preferred image resolution to the same as my high res image at 4039 x 2412 so that now the low res preferred image matched the high res image in aspect ratio and pixel count/resolution. So then I used that and my high res image for my two layers to get the cube file and externally applied that cube file to my high res image. It turned out a complete mess.
I did have some good success with the Colors/Transfer Colors [PCA] filter. Funny thing is my "manual" piece meal adjustment of the high res image that I posted in post #5 to try to match it to the preferred image looks almost identical to the result of the Transfer Colors [PCA] filter result, which turned out like this here...
![[Image: Young-America-GMIC-Colors-Transfer-Colors.png]](https://i.postimg.cc/1XGFXy2w/Young-America-GMIC-Colors-Transfer-Colors.png)
That's the high res image with the transfer color filter. It looks pretty good. I like it. It's got that brownish look on the hull of the ship like in the preferred image. Still wished I knew what software and filter that person used on that other image though.
Here's the bottom image layer I used for the color transfer of the preferred image with the addition of the canvas space on the sides and then scaled up to 4039 x 2412...
![[Image: Color-Transfer-Base-Image.png]](https://i.postimg.cc/TYxmSW59/Color-Transfer-Base-Image.png)
Posts: 20
Threads: 6
Joined: Feb 2019
Reputation:
1
Gimp version:
Operating system(s): Windows (Vista and later)
08-16-2025, 02:05 AM
(This post was last modified: 08-16-2025, 02:18 AM by AceMcHammer.)
The is my final best try. A Duplicate-Multiply image layer in conjunction with the GMIC Transfer Color PCA filter using the target image as the bottom layer transfer color (w/slight curves, hue-saturation, color temp adjustment). This isn't exactly like the target image but all the same this is a sweet image...
high res. have at it world
https://www.mediafire.com/file/qxk4qgint...A.png/file
![[Image: Young-America-Duplicate-Multiply-GMIC-Co...or-PCA.png]](https://i.postimg.cc/HLXDnxd6/Young-America-Duplicate-Multiply-GMIC-Color-transfer-color-PCA.png)
Posts: 7,829
Threads: 166
Joined: Oct 2016
Reputation:
1,078
Gimp version:
Operating system(s): Linux
08-16-2025, 09:44 AM
(This post was last modified: 08-16-2025, 09:45 AM by rich2005.)
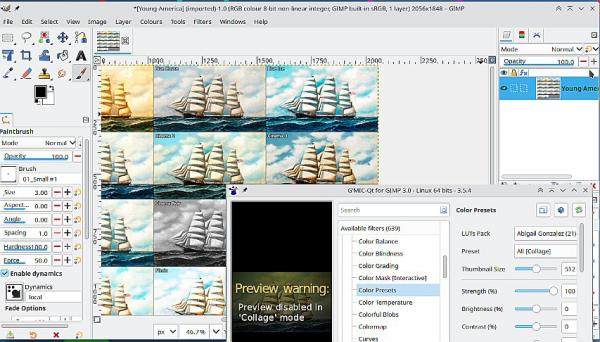
This is a bit off-topic, it is more general that applying a mask.
For those of you with a gmic plugin, in the Color Presets section there are hundreds of pre-made look up tables (LUT). You can select a pack and scroll through the presets. Also the first entry is to render a collage for a comparison of the effects. Something for eveyone.

Posts: 1,390
Threads: 211
Joined: Sep 2018
Reputation:
129
Gimp version:
Operating system(s): Windows 11
(08-16-2025, 09:44 AM)rich2005 Wrote: This is a bit off-topic, it is more general that applying a mask.
For those of you with a gmic plugin, in the Color Presets section there are hundreds of pre-made look up tables (LUT). You can select a pack and scroll through the presets. Also the first entry is to render a collage for a comparison of the effects. Something for eveyone.
Some links to free legal download LUT's
https://www.shutterstock.com/blog/free-l...gle.com%2F
https://www.on1.com/free/luts/?srsltid=A...v0YQAw85Gh
https://filtergrade.com/free-luts-downlo...P7gNf79g8_
https://tdcat.com/downloads/free-lut-packs
https://www.filmicpro.com/products/luts
https://www.freepresets.com/product-cate...okup-table
|


![[Image: Young-America-High-Res-clut-applied.png]](https://i.postimg.cc/nhTq7GTW/Young-America-High-Res-clut-applied.png)
![[Image: Young-America-GMIC-Colors-Transfer-Colors.png]](https://i.postimg.cc/1XGFXy2w/Young-America-GMIC-Colors-Transfer-Colors.png)
![[Image: Color-Transfer-Base-Image.png]](https://i.postimg.cc/TYxmSW59/Color-Transfer-Base-Image.png)
![[Image: Young-America-Duplicate-Multiply-GMIC-Co...or-PCA.png]](https://i.postimg.cc/HLXDnxd6/Young-America-Duplicate-Multiply-GMIC-Color-transfer-color-PCA.png)