Thread Rating:
  • 0 Vote(s) - 0 Average
  • 1
  • 2
  • 3
  • 4
  • 5
Removing object with GMIC not working
#1
I followed this tutorial but when I get to the point of applying or hitting okay the progress bar comes up for a couple of seconds but nothing happens. Any insight as to how to make this work?

Remove Anything From A Photograph in Gimp using GMIC


Reply
#2
How big, in pixels, is the area that you're trying to replace and how long did you wait for it to complete?

I ask because it's a slow process and will obviously take longer with bigger numbers of pixels to replace.
Reply
#3
I followed in the video. Using G'MIC 2.9.2 - Gimp 2.10.21.
After clicking OK, G'mic only generates a copy of the input layer.
Even with small images (500x300).
The result is almost immediate, but it only generates a copy of the image with the painted area.
I remember having used this filter in the past and it worked. I think it is a bug.
Reply
#4
Kevin has a very good point about image size. Large image and inpaint runs-and-runs. I thought the video was very fair, not too sure about using free select, the painted-in area does need a hard edge, so set that or use the pencil tool.

Quote:The result is almost immediate, but it only generates a copy of the image with the painted area.

Best guess for that. The painted in colour and the mask colour have to be exact, close is not good enough. Default red has to be 100 red, zero green and zero blue.

gmic input - active layer usually
Output mode depends, for large images in place or use a selection to 'capture' a smaller part of the image.

This example (using Krikors Gimp 2.10.21 & gmic 2.9.2) large image 4000 x 3000 ish but in-paint in selected area, took gmic 10 seconds. One minute demo https://i.imgur.com/p02eTMq.mp4
Reply
#5
I am not sure what happened here ...  Dodgy
After reading the rich2005 post, I tried again and had very different results than before.
Then I remembered that in the morning I was using a laptop and now I am on another PC.
Although my Gimp on the laptop is on the USB flash drive, and on the PC right on the HD, they are still exactly the same version of Gimp. The Usb Flash drive is a 100% copy of my Gimp on HD. I always update the changes between these two drives when they exist.

I realized that the result depends on how the desired area is painted (Which tool), whether or not the selection is active during the execution of the G'MIC. - (Using default values only)

01- I selected the area using the Rectangle Select tool:
01a- I painted the area by dragging the color of the square that displays the active foreground color (ff0000) for the selection.
OK Results:
►If the selection is maintained, G'MIC generates the result only for the selected area, leaving the surrounding area transparent.
►If the selection is deselected, G'MIC generates a new image with the change merged into the image.
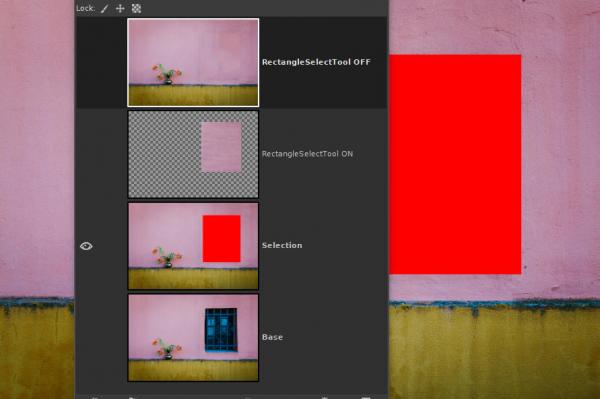
   
01b- I painted the area using Paintbrush or Brush Tool. (ff0000).
02a- With paitbrush, ► if the selection is maintained; G'MIC generates a transparent image with the previously selected area painted in red tones.
02b- With paintbrush, ► if the selection is deselected; the result is that OK, there is a reddish border around the area that had been selected.
03a / 03b- With Pencil tool, ► the same thing happened.
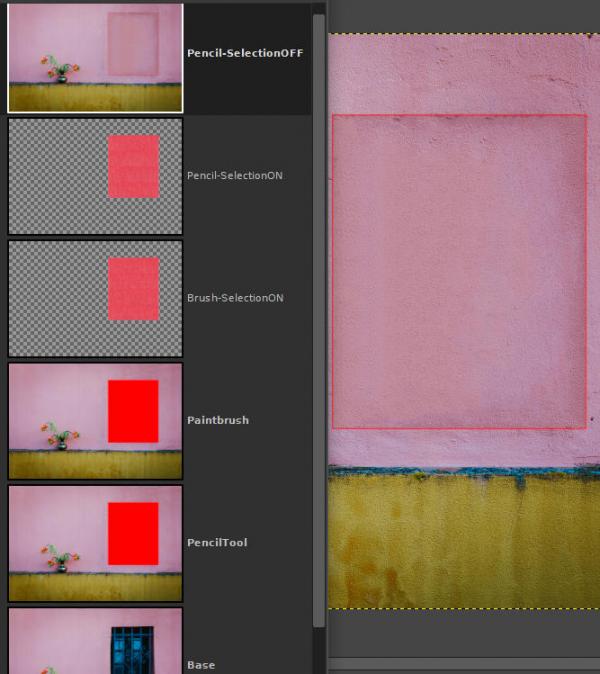
   
Summing up.
Just dragging the color over the selection satisfactorily removed the selected area using the default values of G'MIC.

However in the example given by rich2005, he used the Pencil tool with the selection active and had an ok result.
Reply
#6
(10-22-2020, 09:06 AM)Kevin Wrote: How big, in pixels, is the area that you're trying to replace and how long did you wait for it to complete?

I ask because it's a slow process and will obviously take longer with bigger numbers of pixels to replace.

I don't know how I would determine that.

In the tutorial video the progress bar stays visible for the duration of however long the process is going. When I try it the progress bar stays up for a couple of seconds then disappears.
Reply
#7
(10-22-2020, 05:04 PM)Muzician Wrote:
(10-22-2020, 09:06 AM)Kevin Wrote: How big, in pixels, is the area that you're trying to replace and how long did you wait for it to complete?

I ask because it's a slow process and will obviously take longer with bigger numbers of pixels to replace.

I don't know how I would determine that.

In the tutorial video the progress bar stays visible for the duration of however long the process is going. When I try it the progress bar stays up for a couple of seconds then disappears.
@Muzician ,

Perhaps you would like to try the Heal Selection plugin.
This video shows how to install and use it. Only 3 minutes and 10 seconds of video.
https://youtu.be/RJlNmA4h6ZIgf win10 heal selection
Reply
#8
If you can post a couple of screenshots it will help

1. Gimp showing the tools and tool settings / layer(s) dock along with the image & painted in mask.
2. The gmic settings and options.

The main issues for not getting a result is as mentioned earlier.

The mask colour not the same as painted in the image and defined in gmic. That was dealt with in the video by colour picking the mask colour from within gmic. That will result in a zip-though and no result. Probably the problem.

The input layer as used by gmic. Active is default and if there is only one layer then there is no ambiguity.

The image size. A large image does cause problems. That can be alleviated by a selection larger than the mask area. G'mic does require surrounding pixels to 'paint into' the mask area. Areas of transparency can cause problems.

Finally, the mask does need a hard edge, anti-aliasing results in a coloured border.
Reply


Forum Jump: