Posts: 1,324
Threads: 55
Joined: May 2021
Reputation:
151
Operating system(s):
Gimp version: 2.10
11-27-2023, 10:52 PM
(This post was last modified: 11-27-2023, 11:37 PM by PixLab.)
I just recall the G'MIC filter Shapeism > Still colored map filled with colored dots,
GIMP top menu Filters > G'MIC > a window opens > Artistic > Shapeism
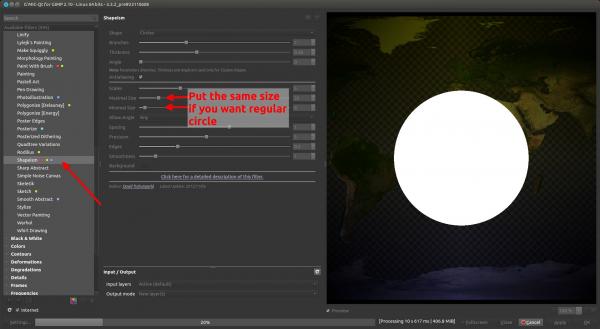
Result
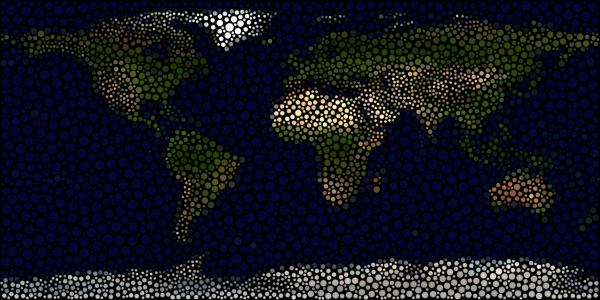
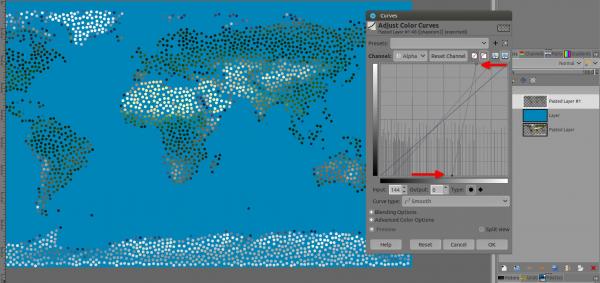
Result with Maximum and Minimum size equal to 10 and spacing at 0 to have regular dots, then with a vertical curve on the alpha channel to let the semi transparent dots disappear or reinforce their opacity depending if you go on the right or the left side
Patrice
Posts: 963
Threads: 77
Joined: Aug 2018
Reputation:
75
Operating system(s):
- Windows (Vista and later)
Gimp version: 2.10
Hi PixLab,
Both the pixalization + Symmetry Tilling and Shapeism techniques produce interesting results!
Out of curiosity, could you enlighten me about the colored dots that appear on your G'MIC screen?
For example next to Shapeism it has 3 colors.
My G'MIC doesn't have any of that.
Thx!
.....
Samj Portable - Gimp 2.10.28 - Win-10 /64.
Posts: 1,324
Threads: 55
Joined: May 2021
Reputation:
151
Operating system(s):
Gimp version: 2.10
11-28-2023, 03:21 PM
(This post was last modified: 11-28-2023, 04:20 PM by PixLab.)
(11-28-2023, 09:34 AM)Krikor Wrote: Hi PixLab,
Both the pixalization + Symmetry Tilling and Shapeism techniques produce interesting results!
Out of curiosity, could you enlighten me about the colored dots that appear on your G'MIC screen?
For example next to Shapeism it has 3 colors.
My G'MIC doesn't have any of that.
Thx!
Thanks Krikor,
Yes 3 colors or even more in some cases, it's to recognize the filter from afar and gives MY category/utilities/to-study/whatnot 
To add colors > Just right-click on a filter's name in that list, a context menu will opens, select a color, or put to Fave, to add multiple colors => I just re-right-click and add a different color
To Remove a color, just re-right click on the filter's name and un-tick / un-check the color in the context menu
In the context menu if you click or hover with your mouse on Remove All the context menu will expend and will give you the number of filters you did attribute to a color, then just click/un-tick on a color to remove this color from attributed filters
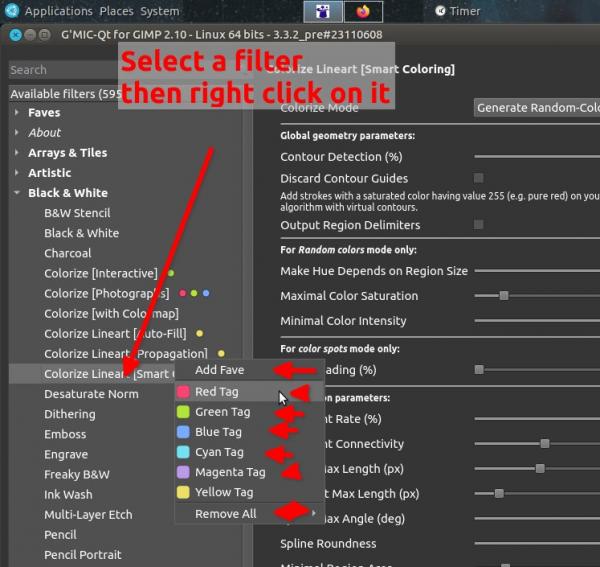
Few other tips about G'MIC (you might know them, but can be useful for visitors reading this 
Once in your Faves you can rename a filter to your wish with a right-click on it, very useful especially with strange naming or to mention your best use.
If you go to Various > Custom Code [Global / Local / Full] and paste some code that for example David Tschumperle gives or Afre or some one else, and then you put that filter in your Faves after having pasted the code, the code you copied/pasted will stay in your faves even after closing G'MIC - GIMP.
Same for any filters you have changed the setting, if you put them in your Fave YOUR setting will be kept even after closing G'MIC and GIMP, thus it's like "adding" a new filters to your G'MIC, very useful when big and complex changes with a lot of sliders involved.
Those 2 icons (below) > The one on the left is to copy the code of the filters with setting you did input to your clipboard
The other one on the right is to reset the filter to default

Patrice
Posts: 963
Threads: 77
Joined: Aug 2018
Reputation:
75
Operating system(s):
- Windows (Vista and later)
Gimp version: 2.10
PixLab,
I had never seen anything that gave a clue that this colored tags feature in G'MIC existed.
I confess that the information you posted in the previous post related to these colored tags was in fact what I was unaware of.
However, I still have no idea how to make use of this resource in a way that makes it useful.
Thank you for introducing me to this "new" feature"
.....
Samj Portable - Gimp 2.10.28 - Win-10 /64.
Posts: 1,324
Threads: 55
Joined: May 2021
Reputation:
151
Operating system(s):
Gimp version: 2.10
11-30-2023, 02:10 AM
(This post was last modified: 11-30-2023, 02:43 AM by PixLab.)
(11-29-2023, 11:30 AM)Krikor Wrote: PixLab,
However, I still have no idea how to make use of this resource in a way that makes it useful.
You can start by tagging with only one color like "red" your top 10 favorite filters or top 10 most used filters, this will allow you to spot them immediately in the long list..
Then later, once you're comfortable you can use another color like "yellow" when you "discover" possibilities with a filter, but want to study it later > tag it with another color to not forgot it.
That's how I did start to tag them, just one color to spot them in a long list, then later on, using another color for a different matter...
Yeah... now it can be over-killed, same for the "Faves", too much can kill the purpose  (I might ask the G'MIC's team one day for the Faves > to have a tree/folder system  )

Patrice
Posts: 46
Threads: 15
Joined: May 2018
Reputation:
0
Operating system(s):
Gimp version: 2.8
hello dear @Ofnuts, @rich2005, @Krikor, @PixLab 
sorry for the late reply. - i was very busy the last week.,
....many thanks for your reply and your support. This is very kind and i am lucky. 
there are different approaches towards this task
@rich2005 you show e.g. in this film: https://imgur.com/FpEVWdO
to recapitulate - all what understood .... in your approach
only one layer is used:
load the SVG in GIMP and
render this
Edit> Fill Path
choose a fill path
choose a file style … with Paintbrush
[x] Pattern
[x] Antialising
i want to do this map now:
again ....many thanks for your reply and your support. This is very kind and i am lucky.
Many thanks for this scaffolding-approach in GIMP and for the help: since you
- give us mini-lessons visible here in this thread,...
gives us many many examples for creating a dotted map with GIMP...i am overwhelmed your lessons are;
- starting points for me (and i am pretty sure for many others too) to make the next steps... and you...;
- describe concepts in multiple ways...;(see above with the different approaches of you, Ofnuts, rich2005, Krikor, PixLab);
- you incorporate practical steps in GIMP and also aids with examples (see the pictures of Krikor and Pixlab);
- all that gives us novices the time to do some things with the first steps (also in creating [dottet] Maps) and yet...
- encourage (all the novices here) to go ahead with little steps; therefore you offer mini-lessions...
@rich2005 you show e.g. in this film: https://imgur.com/FpEVWdO
only one layer is used:
load the SVG in GIMP and
render this
Edit> Fill Path
choose a fill path
choose a file style … with Paintbrush
[x] Pattern
[x] Antialising
i hope that i got this right.
i want to do this map now:
regards say  btw:
btw: this file is a SVG-File ...: File:World map (blue dots).svg
https://commons.wikimedia.org/wiki/File:...ots%29.svg
Posts: 1,324
Threads: 55
Joined: May 2021
Reputation:
151
Operating system(s):
Gimp version: 2.10
12-02-2023, 07:59 AM
(This post was last modified: 12-02-2023, 08:15 AM by PixLab.
Edit Reason: Change the color or the dots? to > Change the color of the dots?
)
(12-01-2023, 07:40 PM)sayhello Wrote: .........//.......................
i want to do this map now:
................//.............
i hope that i got this right.
i want to do this map now:
............//..........
regards say 
btw: this file is a SVG-File ...: File:World map (blue dots).svg
https://commons.wikimedia.org/wiki/File:...ots%29.svg
Something is telling me that you have forgotten something in your post as I don't see any image or link around " i want to do this map now:"
Unless you are speaking about the svg from wikipedia...
But what do you want to do with it? Change the color of the dots?
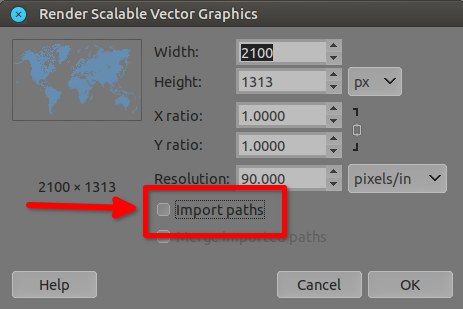
If so, when you import the SVG in gimp Uncheck: the "Import Paths" because we don't need it in this case (and there are more than 11,000 paths in it which could take a while to load)
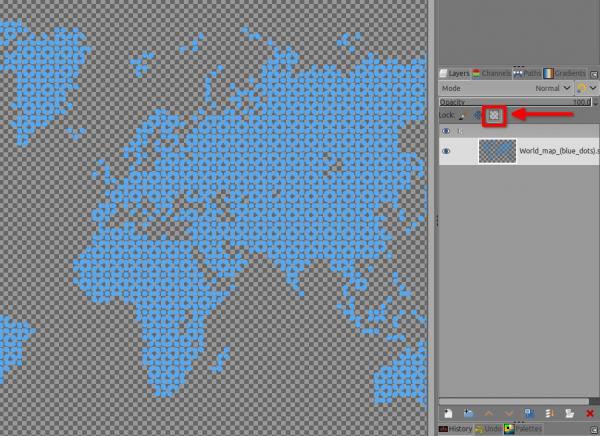
Once imported, in the layer's dialog (AKA layer's stack), click that icon to lock (protect) the alpha channel > To paint the dots, not the transparency.
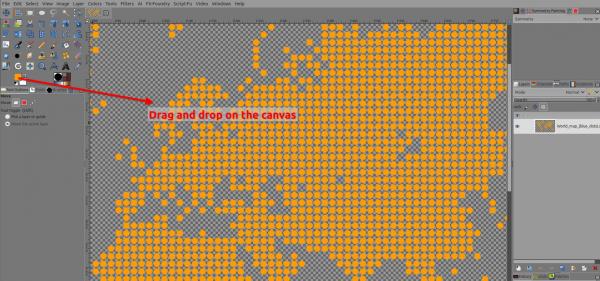
Then just drag and drop any color from the foreground/background color, or use the bucket fill tool
Then once happy with a color, do not forget to un-click on the button in the layer's dialog to un-lock the alpha channel if you need to do additional work 
Patrice
Posts: 46
Threads: 15
Joined: May 2018
Reputation:
0
Operating system(s):
Gimp version: 2.8
12-02-2023, 02:32 PM
(This post was last modified: 12-02-2023, 03:40 PM by sayhello.)
hello dear Patrice, 
many thanks for the reply
i am not so familiar with GIMP but i am willing to learn - and finally i will pick a map to work on this. (as rick 2005 mentioned. from here : https://simplemaps.com/resources/svg-maps
but thank you Patrice for the mini-lesson on working on SVG - examples: so just to dive into the concrete work with the files - i tried to reproduce the steps: .. so why not - and i try to follow your steps - and your example - with the SVG, that you have taken.
.... so since this thread notes to work with SVG - i try to dive into SVG things ... and the work with such files.
you mentioned: 
Quote:1. Unless you are speaking about the svg from wikipedia...
But what do you want to do with it? Change the color of the dots?
If so, when you import the SVG in gimp Uncheck: the "Import Paths" because we don't need it in this case (and there are more than 11,000 paths in it which could take a while to load)
so far so good - this is no problem.
Quote:2. Once imported, in the layer's dialog (AKA layer's stack), click that icon to lock (protect) the alpha channel > To paint the dots, not the transparency.
okay - that step is doable here.
3. see what happened when i choosed a color..
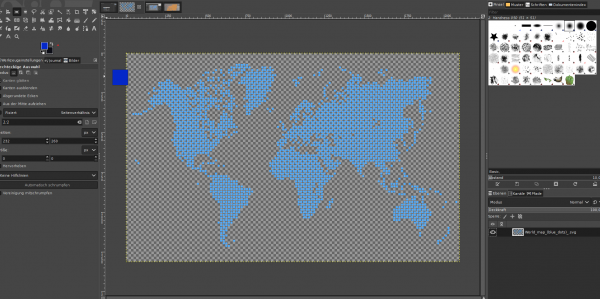
see what happens with the image of the map. 

it gets blue - totally blue ...
did i look something wrong here
note it does not look like your example.
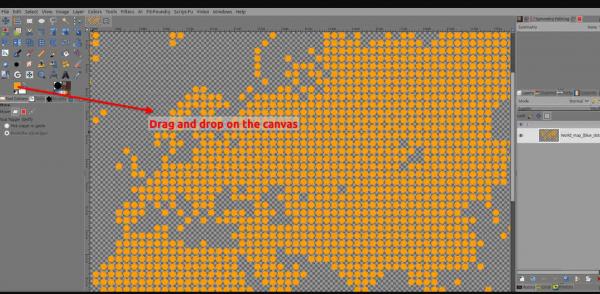
well - i take this as a little example - to get more insights into the work with SVG _ but currently i think i miss some steps ..
on my site - the whole screen got blue 
i will try to figure out why this happens here. I think i have missed one little step.
note: this is for me a great step towards the creation of my map - i will follow your steps and take a " free map "
and then i will follow your instructions - from you all - ofnuts, rick2005, Patrice and all
eg i find it a good way to go like so: - eg to folloiw this approach towards this task
@rich2005 you show e.g. in this film: https://imgur.com/FpEVWdO
to recapitulate - all what understood .... in your approach
Quote:only one layer is used:
load the SVG in GIMP and
render this
Edit> Fill Path
choose a fill path
choose a file style … with Paintbrush
[x] Pattern
[x] Antialising
as Rick mentioned i will pick a map from the ressource he mentioned. : https://simplemaps.com/resources/svg-maps
rick 2005 ,,,,
Quote: For what it is worth, I would use svg outline maps. Open an SVG in Gimp and you determine the size, larger or smaller (within reason) without degradation. Do a search for free svg maps, I used one from here: https://simplemaps.com/resources/svg-maps
well i will do so. but first of all - i ll have to find out what goes wrong with the example that you Patrice mentioned - the SVG from the wikipedia.. - which got blue ....
hopefully i get there.
first of all i pick a free map and then i follow all lthe steps

Posts: 46
Threads: 15
Joined: May 2018
Reputation:
0
Operating system(s):
Gimp version: 2.8
well good evening,
again me - again say..
... on rereading i think that the method and way you, ofnuts: describe is also a very good one.
you say.. that we have to
Quote:Create/obtain a black on white or white on black image of the map at the adequate scale.
In the Channels list drag any of the RGB channels to the list below to copy it
Add a background layer (if necessary)
Add a layer and fill with the dots pattern
Layer > Mask > Add layer mask and select the channel copy you did before. If the map is black on white, tick the Invert mask (or use Colors > Invert later), the goal being to have white (where you want the dots)
Filters > Blur > Pixelize (which should apply to the mask). The block size should be identical to the dot pattern size, and aligned with it (which it will be if you don't try to do clever things). Some of the dots won't be fully opaque at that point.
Colors > Threshold on the mask to make the dots fully opaque or fully transparent
and subsquently you continue... with the following steps:
Quote:create a 20x20 image (for a 20x20 pattern of course)
Make a circle selection (with 1-2px margin if you don't want tangent dots),
Bucket-fill the selection,
Select > All and Edit > Copy
In the pattern selection select the Clipboard image or Clipboard mask patterns (always the first two)
Bucket-fill a new layer with the pattern.
well - what i am trying to find out is - this step.:
Quote:create a 20x20 image (for a 20x20 pattern of course)
Make a circle selection (with 1-2px margin if you don't want tangent dots),
is this the method for the fill-in part .: in other words: this 20 x 20 image; is this a tiny image with the dots!?
do i here - create (in other words) a so called "bucket-fill" selection-image that helps me to fill the layer on the map!?
i am continuing to work on a solution.. therefore i work with maps that i take from here: https://simplemaps.com/resources/svg-maps
note: i want to create a dotted map of
a. a world-map and
b. a map of Europe
so i just dive into the work -
many trhanks for all your great hints - for your advices and your awesome help.
this forum is an outstanding place
regards, say

Posts: 1,324
Threads: 55
Joined: May 2021
Reputation:
151
Operating system(s):
Gimp version: 2.10
12-02-2023, 06:04 PM
(This post was last modified: 12-02-2023, 06:19 PM by PixLab.)
(12-02-2023, 02:32 PM)sayhello Wrote: Quote:1. Unless you are speaking about the svg from wikipedia...
But what do you want to do with it? Change the color of the dots?
If so, when you import the SVG in gimp Uncheck: the "Import Paths" because we don't need it in this case (and there are more than 11,000 paths in it which could take a while to load)
so far so good - this is no problem.
Quote:2. Once imported, in the layer's dialog (AKA layer's stack), click that icon to lock (protect) the alpha channel > To paint the dots, not the transparency.
okay - that step is doable here.
3. see what happened when i choosed a color..
Before step 3 you missed to click on that button in the layer's dialog > this button is important because it's to not fill the transparent areas > Click on it before to fill with a color
Click on the image below to see it in a bigger size, to see what icon/button I am talking about
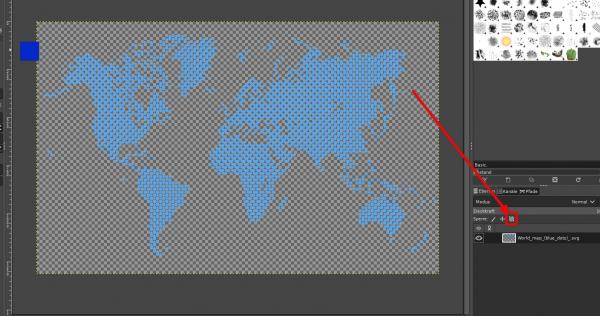
Once that icon is selected, Only then you can drag and drop a color. 
Patrice
|


