Posts: 11
Threads: 2
Joined: Aug 2021
Reputation:
0
Gimp version:
Operating system(s): Windows Vista or 7, 8, 10 (64-bit)
08-11-2021, 06:56 PM
(This post was last modified: 08-11-2021, 07:40 PM by firefly.)
(08-11-2021, 04:09 PM)rich2005 Wrote: Quote:... Now, when I put the file in C:\Users\"yourname"\AppData\Roaming\GIMP\2.10\plug-ins it doesn't show up in the Tool menu or the Batch Image Manipulation menu. Is there another step to make it show up? Do I need to reboot (Windows 10)?
No other steps, except re-starting Gimp. Works as shown in the video.
Edit: Checked again in Windows and can not find problem.
You did unzip it ? When editing careful not to introduce any spaces scale=0.5 is correct scale = 0.5 is not
I did not edit your file, just put it in C:\Users\kidderj\AppData\Roaming\GIMP\2.10\plug-ins
I don't get why I don't see it in the menu?
(08-11-2021, 04:09 PM)rich2005 Wrote: Quote:... Now, when I put the file in C:\Users\"yourname"\AppData\Roaming\GIMP\2.10\plug-ins it doesn't show up in the Tool menu or the Batch Image Manipulation menu. Is there another step to make it show up? Do I need to reboot (Windows 10)?
No other steps, except re-starting Gimp. Works as shown in the video.
Edit: Checked again in Windows and can not find problem.
You did unzip it ? When editing careful not to introduce any spaces scale=0.5 is correct scale = 0.5 is not
I did unzip it and opened it in Notepad ++ but still no menu item.
Posts: 11
Threads: 2
Joined: Aug 2021
Reputation:
0
Gimp version:
Operating system(s): Windows Vista or 7, 8, 10 (64-bit)
(08-11-2021, 04:09 PM)rich2005 Wrote: Quote:... Now, when I put the file in C:\Users\"yourname"\AppData\Roaming\GIMP\2.10\plug-ins it doesn't show up in the Tool menu or the Batch Image Manipulation menu. Is there another step to make it show up? Do I need to reboot (Windows 10)?
No other steps, except re-starting Gimp. Works as shown in the video.
Edit: Checked again in Windows and can not find problem.
You did unzip it ? When editing careful not to introduce any spaces scale=0.5 is correct scale = 0.5 is not
I was able to get it to work by uninstalling and reinstalling the same version of GIMP 2.10.24, no changes to the .py file. Thanks for all your help!
Posts: 1,538
Threads: 71
Joined: May 2021
Reputation:
168
Gimp version:
Operating system(s): Linux
08-12-2021, 03:04 AM
(This post was last modified: 08-12-2021, 03:37 AM by PixLab.)
(08-11-2021, 03:54 PM)firefly Wrote: from what I have read it is better to use saturation, i think it is different.
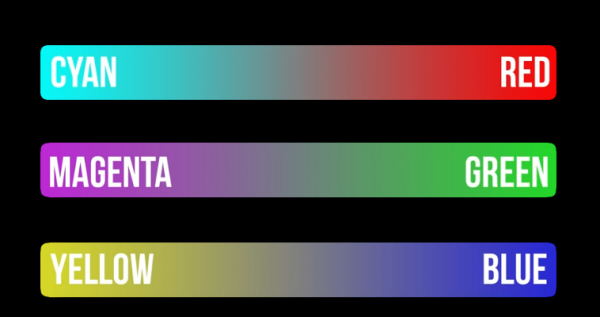
Tried again today with a more "serious" gradient-chart and white writing on black BG
A neutral for you, if you want to try

Color>Saturation quickly bleed out on the white writing especially in the cyan and green (scale up to 2), but all colors will bleed on the white when pushed hardly (scale ➤ 2)
Color> Hue Saturation seems to be a proper one as at equivalent saturation (full throttle in the Hue-Saturation window) cyan and green are not bleeding out
When I said a proper one -> it seems to be... but rich2005 got the point when he says "I guess it is all in the eye of the beholder" 
Posts: 1
Threads: 0
Joined: Jun 2022
Reputation:
0
Gimp version:
Operating system(s): Windows Vista or 7, 8, 10 (64-bit)
06-15-2022, 08:09 AM
(This post was last modified: 06-15-2022, 08:10 AM by iSamurai.)
(08-11-2021, 08:40 AM)rich2005 Wrote: @ firefly
New day, modified plugin with 1.2 as the GEGL Saturation value. There is no 1200, the scale goes from 0.0 to 10.0
Included in the zip is a simple text editor if (when) you need to modify the scale value. It is not difficult.
This a video demo, from unpacking the zip through to applying BIMP. https://youtu.be/JNlbuYJlHEQ
Quote:Or if there is an easier way, like doing a batch command that would utilize the saturation level of an existing file.
I do not think so, there is a way with the g'mic plugin of comparing a before / after pair, extracting a color-look-up-table (CLUT) and applying that to other images. Not sure you can apply that particular gmic filter with BIMP.
Another way is, adjust an image with the color-curve tool and save the curve settings as a file. BIMP will apply that color-curve using the file.
@PixLab
nice screenshots, pays to read the first post as the OP specifically does not want to use hue-saturation.
Hey, just wanted to say thanks for writing this plugin up!
(08-12-2021, 03:04 AM)PixLab Wrote: (08-11-2021, 03:54 PM)firefly Wrote: from what I have read it is better to use saturation, i think it is different.
Tried again today with a more "serious" gradient-chart and white writing on black BG
A neutral for you, if you want to try
Color>Saturation quickly bleed out on the white writing especially in the cyan and green (scale up to 2), but all colors will bleed on the white when pushed hardly (scale ➤ 2)
Color> Hue Saturation seems to be a proper one as at equivalent saturation (full throttle in the Hue-Saturation window) cyan and green are not bleeding out
When I said a proper one -> it seems to be... but rich2005 got the point when he says "I guess it is all in the eye of the beholder" 
The GIMP manual has a link to this page explaining why there is a difference: https://ninedegreesbelow.com/photography...hroma.html
Posts: 11
Threads: 2
Joined: Aug 2021
Reputation:
0
Gimp version:
Operating system(s): Windows Vista or 7, 8, 10 (64-bit)
(08-10-2021, 08:47 PM)firefly Wrote: (08-10-2021, 07:54 PM)rich2005 Wrote: (08-10-2021, 04:55 PM)firefly Wrote: How do I do batch Color Saturation? I don't see an option in the Batch Manipulation menu and I don't want to use Hue Saturation.
Is this using BIMP the batch plugin ? If it is you can not use theColor -> Saturation filter directly. It is GEGL and not selectable as a "Other Gimp Operation" in BIMP.
You can 'wrap' the GEGL command in a python script which BIMP recognizes. If you are willing to do a little editing, a basic python plugin is attached.
First find the Saturation value you need from using Gimp on a typical image. That is the Scale value. Get a decent text editor (not notepad or wordpad) Usually Notepad++ and replace the value scale=10 in the script at line 52 eg. scale=0 is total desaturation. scale=2.5 is well across the GUI slider.
[code]
- - - - - -
def for_gegl_command(image, drawable):
# put your GEGL command here
# saturation scale minimum value 0 max value 10
gegl_graph_string="saturation scale=10 colorspace=0"
- - - - - -
[code]
Unzip the attachment. For windows the plugin goes in C:\Users\"yourname"\AppData\Roaming\GIMP\2.10\plug-ins
The plugin registers in the Tools menu and you can try it out on an image.
In BIMP it is a "Other Gimp Procedure"
I normally use linux but tried out in a Win10 / Gimp 2.10.24 and it works with a few flashing on / off terminals as BIMP calls the plugin.
Not making separate screenshots for this one see: https://i.imgur.com/Gta0EUX.jpg Top the images used. Middle - the BIMP function Bottom - BIMP working, between first and second image. Not going to break any speed records but does get there.
EDIT: Thats it for today, bye
I really appreciate the information you sent. I went as far as installing Notepad ++ and viewed the attached file hoping I might be able to figure it out. I am totally a beginner when it comes to scripting so even with your guidance I couldn't figure out what the syntax should look like in the .py file.
I don't suppose you would go so far as to give me a section of code that I could insert that would give me Color > Saturation = 1200?
Or if there is an easier way, like doing a batch command that would utilize the saturation level of an existing file?
Hi Rich2005, are you aware of a batch color saturation plugin for GIMP 3.10? When I upgraded I lost the batch menu item. Thanks.
Posts: 7,886
Threads: 168
Joined: Oct 2016
Reputation:
1,079
Gimp version:
Operating system(s): Linux
09-13-2025, 07:53 AM
(This post was last modified: 09-13-2025, 10:26 AM by rich2005.
Edit Reason: typo
)
(09-13-2025, 12:07 AM)firefly Wrote: ...snip...
Hi Rich2005, are you aware of a batch color saturation plugin for GIMP 3.10? When I upgraded I lost the batch menu item. Thanks.
There is the Batcher python plugin for Gimp 3. https://github.com/kamilburda/batcher Download is there + a few screenshots.
Installed it adds several new entries in the File menu, and which one you use depends on purpose. Saved image files or maybe a stack of layers open in Gimp.
Assuming a set of image files, different sizes and maybe different formats. Use one of the images to determine a suitable value for Colors -> Saturation.
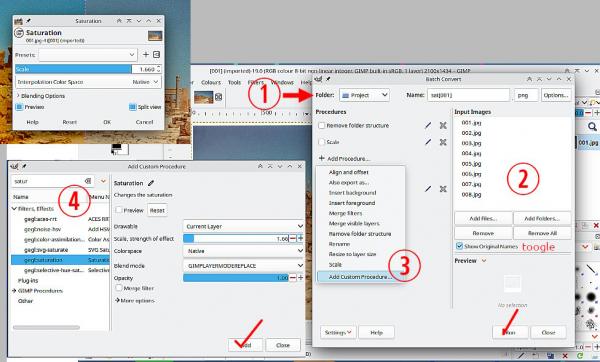
To get you started, it might go like this: File -> Batch Convert

(1) This is where the saturated images end up Folder / new name / format.
(2) Add files or folders for the images to process.
(3) Add Procedure -> Add Custom Procedure.
(4) Search for the filter you want to use, in this case the GEGL saturation. Enter the parameter(s) you determined at the beginning and then Add.
..If you need more filters repeat that process.
All being well, you can run that and get a new set of images. (Always keep the originals in case of screw-ups)
If it is a stack of layers open in Gimp, the process is the same except the Batcher menu item to use is File -> Edit Layers and the effect is applied in place.
|


