Posts: 63
Threads: 15
Joined: Feb 2018
Reputation:
0
Operating system(s): OSX
![[Image: gray-mess.jpg]](https://i.postimg.cc/qqw3h62N/gray-mess.jpg)
I've got a whole document that looks like this; the text is faded, and there's this pale gray… CLOUD... around it. Anything I do to try to fade or remove the cloud makes the text worse; the light areas of text are just too close to the color of the cloud. Darkening the text also darkens the cloud for the same reason. There's got to be a way, though, right…?
Posts: 1,447
Threads: 219
Joined: Sep 2018
Reputation:
134
Gimp version:
Operating system(s): Windows 11
Bad picture but give it a try with (use the different sliders for satisfied result):
G'MIC-Qt / Repair / Repair Scanned Document
G'MIC-Qt / Black & White / Multi-Layer Etch

Posts: 63
Threads: 15
Joined: Feb 2018
Reputation:
0
Operating system(s): OSX
That definitely looks better… Unfortunately, that plug-in does not exist for the Mac.
Posts: 6,951
Threads: 297
Joined: Oct 2016
Reputation:
605
Gimp version:
Operating system(s): Linux
03-07-2023, 11:01 AM
(This post was last modified: 03-07-2023, 11:06 AM by Ofnuts.)
Obtaining this:
The process:
- Use Filters > Enhance > Wavelet decompose (max lelvels: 7)
- Make all decomposition layers invisible, then make then visible one by one from the bottom
- You eventually get some kind of smear that covers your text (level 3 here)

- Open the channels list, and drag any of the RGB channels in the list below to copy it(*)
- Make it visible and apply a threshold to isolate the text

- Right click and Channel to selection
- Add new layer at top, and fill selection with white
A slightly simpler way is to apply a Gaussian blur instead of finding the appropriate level of wavelet decomposition, but I find it a bit less accurate.
If necessary you can use Curves in the result to add a bit more contrast without being bothered by the murky background:
(*) Warning: this deselects the channel that you dragged, so click on it to re-select it otherwise later changes won't apply to it (for instance painting with white will appear purple if you dragged the Green channel).
Posts: 7,970
Threads: 170
Joined: Oct 2016
Reputation:
1,090
Gimp version:
Operating system(s): Linux
03-07-2023, 11:18 AM
(This post was last modified: 03-07-2023, 11:20 AM by rich2005.)
It is a problem with that small text and your sample might not tell the whole story.
You might get something from
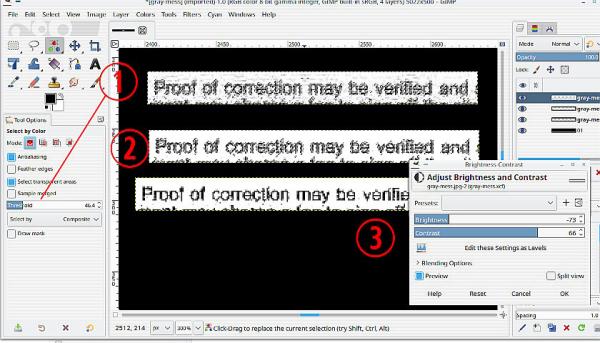
(1) colour select the background with an increased threshold value. Not too much or it eats into the text.
(2) bucket fill the selection with white.
(3) selection off and play with brightness and contrast filter.

One thing you could try to assist the editing, is scale the image up say 400% do the editing then scale (25%) the image back down to original. That should introduce a bit of anti-aliasing to the text and make it less 'pixelly'
Posts: 1,538
Threads: 71
Joined: May 2021
Reputation:
168
Gimp version:
Operating system(s): Linux
03-07-2023, 04:35 PM
(This post was last modified: 03-07-2023, 04:46 PM by PixLab.)
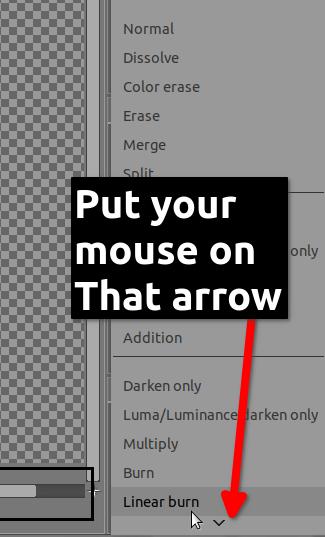
Duplicate your layer, put the one on top in Grain Merge mode.

May be you can duplicate one more time and put the later in Burn mode if you want a thicker font

But in the end your sample image is way too small to do any proper try, I mean we don't really see what the result on this tiny thing you gave us, if something seems to work on 1 square millimeter, it might/will not work on an A4 full page...
Posts: 63
Threads: 15
Joined: Feb 2018
Reputation:
0
Operating system(s): OSX
03-09-2023, 01:44 AM
(This post was last modified: 03-09-2023, 02:00 AM by HavingTooMuchFun.)
(03-07-2023, 11:01 AM)Ofnuts Wrote: Obtaining this:
The process:
- Use Filters > Enhance > Wavelet decompose (max lelvels: 7)
- Make all decomposition layers invisible, then make then visible one by one from the bottom
- You eventually get some kind of smear that covers your text (level 3 here)
- Open the channels list, and drag any of the RGB channels in the list below to copy it(*)
- Make it visible and apply a threshold to isolate the text
- Right click and Channel to selection
- Add new layer at top, and fill selection with white
A slightly simpler way is to apply a Gaussian blur instead of finding the appropriate level of wavelet decomposition, but I find it a bit less accurate.
If necessary you can use Curves in the result to add a bit more contrast without being bothered by the murky background:
(*) Warning: this deselects the channel that you dragged, so click on it to re-select it otherwise later changes won't apply to it (for instance painting with white will appear purple if you dragged the Green channel).
I did the wavelet thing, which appeared to make no visible change to the image. I did what I think you meant by making layers invisible, by unchecking the eyes, which also didn't change anything, and then rechecked them one by one, which ALSO didn't change anything. The wavelet decompose box comes up with "Create a layer group to store the decomposition" pre-checked, and "Add a layer mask to each scales layers" NOT checked… could this be the problem?
(03-07-2023, 11:18 AM)rich2005 Wrote: It is a problem with that small text and your sample might not tell the whole story.
You might get something from
(1) colour select the background with an increased threshold value. Not too much or it eats into the text.
(2) bucket fill the selection with white.
(3) selection off and play with brightness and contrast filter.
One thing you could try to assist the editing, is scale the image up say 400% do the editing then scale (25%) the image back down to original. That should introduce a bit of anti-aliasing to the text and make it less 'pixelly'
I spent a long time with bucket fill and brightness and contrast, and couldn't find a way to affect the gray cloud at all without adversely affecting the text, much less eliminating the cloud. Scaling the image up and down is a good thing to know in general, so thanks for that, but as far as I can tell it didn't change anything in this case. 
(03-07-2023, 04:35 PM)PixLab Wrote: Duplicate your layer, put the one on top in Grain Merge mode.
May be you can duplicate one more time and put the later in Burn mode if you want a thicker font
But in the end your sample image is way too small to do any proper try, I mean we don't really see what the result on this tiny thing you gave us, if something seems to work on 1 square millimeter, it might/will not work on an A4 full page...
I don't appear to have Grain Merge mode…? Is this a Mac vs PC thing, or part of that plug-in that doesn't exist for the Mac?
Posts: 1,538
Threads: 71
Joined: May 2021
Reputation:
168
Gimp version:
Operating system(s): Linux
03-09-2023, 05:51 AM
(This post was last modified: 03-09-2023, 07:10 AM by PixLab.)
(03-09-2023, 01:44 AM)HavingTooMuchFun Wrote: I don't appear to have Grain Merge mode…? Is this a Mac vs PC thing, or part of that plug-in that doesn't exist for the Mac?
Nothing to do with Mac, it's in all GIMP for all platform, it's not an external/third party plug-in
Which version of GIMP do you have? it was already in GIMP as far as I can recall oldest version, even before (LCh modes might be later, but not Grain Merge)
Question: Did you scroll down enough on the list?
GIMP has 38 layer's mode! (+1 specific only for the group, and +1 specific for filters), Grain merge is the 28th in the list

Posts: 7,970
Threads: 170
Joined: Oct 2016
Reputation:
1,090
Gimp version:
Operating system(s): Linux
03-09-2023, 08:33 AM
(This post was last modified: 03-09-2023, 08:35 AM by rich2005.
Edit Reason: typo
)
Quote:..I spent a long time with bucket fill and brightness and contrast, and couldn't find a way to affect the gray cloud at all without adversely affecting the text, much less eliminating the cloud. ..
I would say, either you did not make a suitable selection of the background or the sample image is not representative of the full image. With such small text, never going to be wonderful. Another way is not Gimp, sometimes possible to OCR text. However this, scaled / edited / scaled back to size.

Posts: 709
Threads: 48
Joined: Oct 2016
Reputation:
49
Gimp version:
Operating system(s): Windows 10
I got rid of the 'cloud' just by using contrast
|
![[Image: gray-mess.jpg]](https://i.postimg.cc/qqw3h62N/gray-mess.jpg)


