Posts: 7,992
Threads: 171
Joined: Oct 2016
Reputation:
1,092
Gimp version:
Operating system(s): Linux
@User
Quote:Is GIMP as Photoshop or Photoshop have more option/anything
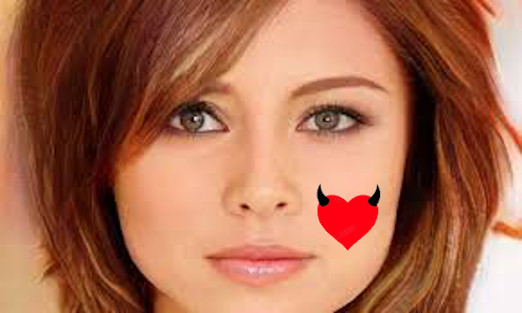
I have to confess, Not at all sure what you intended  At first I though maybe this:
![[Image: NvUbjQs.jpg]](https://i.imgur.com/NvUbjQs.jpg)
...but then maybe this:
![[Image: SrUWTbV.jpg]](https://i.imgur.com/SrUWTbV.jpg)
As it turned out neither of those. One thing you should note, the 'heart-n-horns' image is in indexed mode and you only get away with the paste-into, because the portrait is RGB mode.
Posts: 21
Threads: 1
Joined: Nov 2019
Reputation:
0
Gimp version:
Operating system(s): OSX/macOS
(11-06-2019, 08:40 AM)Blighty Wrote: (11-06-2019, 08:09 AM)User Wrote: Is GIMP as Photoshop or Photoshop have more option/anything
You can achieve the same end result with Gimp or Photoshop. But they are not equivalents. Gimp has features that photoshop does not have; and photoshop has features that Gimp does not have.
the same end result is good 
I have pictures that out of focus and not clear; that I've used them on Wordpress.
Any instructions how to refresh's them?
For ex. I go to COLOR-Auto and try different options.....but maybe there are others/additional ways to improve qualities of photos?
thanks
Posts: 1,451
Threads: 220
Joined: Sep 2018
Reputation:
134
Gimp version:
Operating system(s): Windows 11
Refreshing pictures is always tricky because you change the scene you have taken to a scene (color) was not really there, but the eye want to see full colors and scharp pictures. Think about this so that you don't overdo colors and sharpness.
The easy ones :
-If a picture is to dark, make a copy of the layer and choose for the upper layer mode screen
-If a picture is to bright, make a copy of the layer and choose for the upper layer mode multiple
- play with the GIMP colours/color tools
Interesting :
GmicQt :
- make the dark sections brighter : lights&shadows/pop shadows
- make the picture sharp : details/mighty details (mix with original layer picture)
- make the colors better : colors/colors + basic adjestments also colors/color presets
Posts: 21
Threads: 1
Joined: Nov 2019
Reputation:
0
Gimp version:
Operating system(s): OSX/macOS
(11-06-2019, 08:40 AM)Blighty Wrote: (11-06-2019, 08:09 AM)User Wrote: Is GIMP as Photoshop or Photoshop have more option/anything
You can achieve the same end result with Gimp or Photoshop. But they are not equivalents. Gimp has features that photoshop does not have; and photoshop has features that Gimp does not have.
How to make color more appealing/fresh on the pictures that out to focus?
I've tried to to Color - Map- white space.. etc
Are the any direction in GIMP to deal with refreshing photos?
thanks.
Posts: 21
Threads: 1
Joined: Nov 2019
Reputation:
0
Gimp version:
Operating system(s): OSX/macOS
(11-06-2019, 09:22 AM)rich2005 Wrote: @User
Quote:Is GIMP as Photoshop or Photoshop have more option/anything
I have to confess, Not at all sure what you intended  At first I though maybe this: At first I though maybe this:
![[Image: NvUbjQs.jpg]](https://i.imgur.com/NvUbjQs.jpg)
...but then maybe this:
![[Image: SrUWTbV.jpg]](https://i.imgur.com/SrUWTbV.jpg)
As it turned out neither of those. One thing you should note, the 'heart-n-horns' image is in indexed mode and you only get away with the paste-into, because the portrait is RGB mode.
Actually, your adjusted images looks more impressive  But I don't keep this heart-n-horns' image since I've already add. it to an another picture. What indexed mode mean/extension of image?
Is it important for quality picture ext: jpeg, jpg, png, others. I've heard that php keep more information... But I put those pictures on Wordpress side where resolution 72 as for web. Should I worry about extension, size to download ,others?
Posts: 21
Threads: 1
Joined: Nov 2019
Reputation:
0
Gimp version:
Operating system(s): OSX/macOS
(11-06-2019, 05:32 PM)denzjos Wrote: Refreshing pictures is always tricky because you change the scene you have taken to a scene (color) was not really there, but the eye want to see full colors and scharp pictures. Think about this so that you don't overdo colors and sharpness.
The easy ones :
-If a picture is to dark, make a copy of the layer and choose for the upper layer mode screen
-If a picture is to bright, make a copy of the layer and choose for the upper layer mode multiple
- play with the GIMP colours/color tools
Interesting :
GmicQt :
- make the dark sections brighter : lights&shadows/pop shadows
- make the picture sharp : details/mighty details (mix with original layer picture)
- make the colors better : colors/colors + basic adjestments also colors/color presets
You wrote:
"-If a picture is to dark, make a copy of the layer and choose for the upper layer mode screen"
On GIMP10 on Layer menu I could not find "copy" ..
1.Do you mean duplicate/something else?
2. Where "layer mode screen" located?
Can I directly work to make it darker/lighter with Color-Brightness-Contrast or working with layers preferable?
thanks
Posts: 1,451
Threads: 220
Joined: Sep 2018
Reputation:
134
Gimp version:
Operating system(s): Windows 11
Posts: 21
Threads: 1
Joined: Nov 2019
Reputation:
0
Gimp version:
Operating system(s): OSX/macOS
11-07-2019, 06:57 PM
(This post was last modified: 11-07-2019, 09:19 PM by User.)
(11-07-2019, 06:57 PM)User Wrote: I found it 
Could you point out some specific mode for lighter as you did for bright(multiple)?
After I improve a picture follow as above should I just export it with the old name?
You wrote:
"- make the dark sections brighter : lights&shadows/pop shadows"
How to proceed with that , like select section and then adjust/anything else??
thanks
Posts: 62
Threads: 30
Joined: Jun 2019
Reputation:
0
Gimp version:
Operating system(s): Windows (Vista and later)

I wasn't sure exactly what final image you had in mind so I did the following, trying to make it as streamlined as possible. Open the woman image, duplicate it, and double it in size (you don't have to but this makes it easier to work on, at least for me). Open the heart with horns image, duplicate it, make sure the alpha channel is active (Layers to Transparency to Add Alpha Channel), then select the background, delete it, and save as .png (you are making a new .png file). Then open this new heart and horns file with Open as Layers and use the move tool to move it in place. I sized it down a bit (Layer to Scale Image).
Posts: 21
Threads: 1
Joined: Nov 2019
Reputation:
0
Gimp version:
Operating system(s): OSX/macOS
11-08-2019, 02:01 AM
(This post was last modified: 11-08-2019, 02:10 AM by User.)

[attachment=3401 Wrote:sl60 pid='15443' dateline='1573164805'][attachment=3401][attachment=3401]
I wasn't sure exactly what final image you had in mind so I did the following, trying to make it as streamlined as possible. Open the woman image, duplicate it, and double it in size (you don't have to but this makes it easier to work on, at least for me). Open the heart with horns image, duplicate it, make sure the alpha channel is active (Layers to Transparency to Add Alpha Channel), then select the background, delete it, and save as .png (you are making a new .png file). Then open this new heart and horns file with Open as Layers and use the move tool to move it in place. I sized it down a bit (Layer to Scale Image).
I've done as below(not duplicate anything):
1. 0pen 2 images
2.copy a horn and past into a face
3 Layer To New Layer
4 Select Transparency-Color -to-Alpha
5. Layer transform/move
It would be even simple if substitute 2: select first place on face and then past.....butit doesn't work yet..
Any idea how to simplify complete task by not loosing quality?
[attachment=3400][attachment=3400]
|
 At first I though maybe this:
![[Image: NvUbjQs.jpg]](https://i.imgur.com/NvUbjQs.jpg)
![[Image: SrUWTbV.jpg]](https://i.imgur.com/SrUWTbV.jpg)
 At first I though maybe this:
![[Image: NvUbjQs.jpg]](https://i.imgur.com/NvUbjQs.jpg)
![[Image: SrUWTbV.jpg]](https://i.imgur.com/SrUWTbV.jpg)


