Posts: 1,063
Threads: 88
Joined: Aug 2018
Reputation:
83
Gimp version:
Operating system(s): Windows Vista or 7, 8, 10 (64-bit)
03-30-2022, 04:31 PM
(This post was last modified: 03-30-2022, 04:45 PM by Krikor.)
(03-30-2022, 04:20 PM)PixLab Wrote: (03-30-2022, 03:55 PM)Krikor Wrote: In addition to the lack of uniformity in the background transparency, the contour always presented a pixelation not shown in the other results exposed here on the forum.
So I changed the image before testing the steps.
Click on the OP's image ➤ a new window/tab opens, right click ➤ copy image, then in GIMP 'File ➤ Create ➤ From clipboard` you got the original from the OP which has no defect
or here directly https://www.gimp-forum.net/attachment.php?aid=7673 
Awesome PixLab this tip!
I suffered a lot with the image I had downloaded.
Now following your tip, I got a clean image ready for editing!
Thank you very much! 
Great to see and try out all the suggestions. I always learn a lot this way.
I confess that following in Denzjos' footsteps was complicated and somewhat laborious. But the result is very good.
The settings for Fuzzy Select in Tmanni's tip are something I'll need some time to understand how they really work in this edition.
Never before have I used "Diagonal neighbors checked" or "Select By : Alpha"
Thanks to everyone for the contributions!
.....
Samj Portable - Gimp 2.10.28 - Win-10 /64.
Posts: 6,955
Threads: 297
Joined: Oct 2016
Reputation:
605
Gimp version:
Operating system(s): Linux
03-30-2022, 05:13 PM
(This post was last modified: 03-30-2022, 05:19 PM by Ofnuts.)
(03-30-2022, 04:26 PM)Krikor Wrote: By superimposing the final result (the opposite image) over the contours of the initial image, with a red layer in the background, it is possible to see a small gap generated in this process.
At least in my tests, only the procedure suggested by Denzjos did not present this gap.
![[Image: jaZ6k00.jpg]](https://i.imgur.com/jaZ6k00.jpg)
A faint gap is normal and expected!
If your process is correct, the pixels that are anti-aliased black-to-transparent become anti-aliased transparent-to-black, or, in other words, they get the complementary opacity so are still only partially opaque. So when you overlap both images, you overlap partially opaque pixels with other partially opaque pixels and cannot get a full opacity, so you see a faint gap.
If there is no gap, the opposite image is too thick, and if there are fully transparent pixels in the gap, the opposite image is too thin.
It's the same as doing this:
- Create a layer filled with black and duplicate it.
- Create a circle selection
- On one layer, delete the selection
- On the other layer, Select > Invert and delete the selection
- Check the result over a white layer
- You can also (without a white background) use the pointer dialog to check the alpha of the pixels in the gap and check that all pixels are above 75% opacity(*)
(*) because the pixels with opacity X in one layer will have opacity 1-X in the other. When you apply this in the alpha-compositing formula the resulting opacity is expressed by 1-X+X² which in the [0.0, 1.0] range has a minimum of 0.75 for X=0.5
Posts: 1,543
Threads: 73
Joined: May 2021
Reputation:
168
Gimp version:
Operating system(s): Linux
03-30-2022, 05:24 PM
(This post was last modified: 03-30-2022, 05:39 PM by PixLab.)
I found something else. just for fun 
A Black layer under original
Original in Color Erase mode (or erase or split)
New from visible (or faster with merge down button)
Fuzzy the outside on the new from visible
select Grow 1 or more
delete
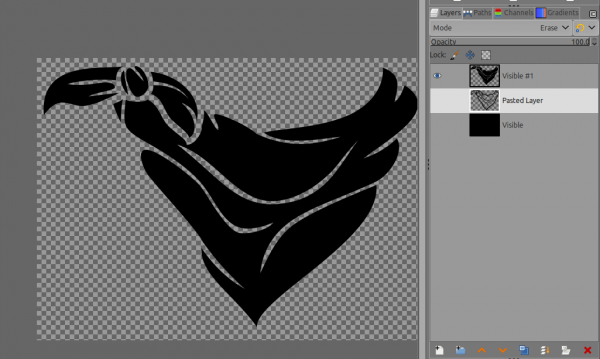
gap almost non existent (you really need to zoom in to see some trace of transparency)
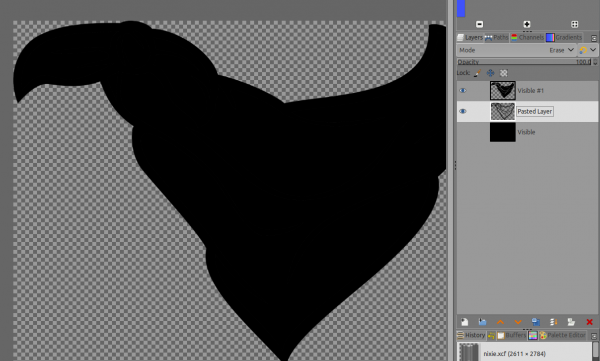
Posts: 1,063
Threads: 88
Joined: Aug 2018
Reputation:
83
Gimp version:
Operating system(s): Windows Vista or 7, 8, 10 (64-bit)
03-30-2022, 05:58 PM
(This post was last modified: 03-30-2022, 06:24 PM by Krikor.)
(03-30-2022, 05:13 PM)Ofnuts Wrote: A faint gap is normal and expected!
If your process is correct, the pixels that are anti-aliased black-to-transparent become anti-aliased transparent-to-black, or, in other words, they get the complementary opacity so are still only partially opaque. So when you overlap both images, you overlap partially opaque pixels with other partially opaque pixels and cannot get a full opacity, so you see a faint gap.
If there is no gap, the opposite image is too thick, and if there are fully transparent pixels in the gap, the opposite image is too thin.
It's the same as doing this:
- Create a layer filled with black and duplicate it.
- Create a circle selection
- On one layer, delete the selection
- On the other layer, Select > Invert and delete the selection
- Check the result over a white layer
- You can also (without a white background) use the pointer dialog to check the alpha of the pixels in the gap and check that all pixels are above 75% opacity(*)
(*) because the pixels with opacity X in one layer will have opacity 1-X in the other. When you apply this in the alpha-compositing formula the resulting opacity is expressed by 1-X+X² which in the [0.0, 1.0] range has a minimum of 0.75 for X=0.5
I must be doing something wrong at some point.
I couldn't reproduce the expected faint gap.
In any case, it explains why Denzjos doesn't have that faint gap. With the stroke path, a belt is created that covers this gap.
 FaintGap.xcf
 (Size: 10.05 KB / Downloads: 355)
(03-30-2022, 05:24 PM)PixLab Wrote: I found something else. just for fun 
A Black layer under original
Original in Color Erase mode (or erase or split)
New from visible (or faster with merge down button)
Fuzzy the outside on the new from visible
select Grow 1 or more
delete
gap almost non existent (you really need to zoom in to see some trace of transparency)
PixLab, I think you've squeezed it to the limit!
In terms of result and simplicity this method seems to be a winner!
I took advantage of the previous Ofnuts post and examined the faint gap generated by your last method.
In the coordinate X=742, Y=422 I found the following values of Alpha:
18.8% on the top layer and 81.2% on the bottom layer.
If I use the Color Picker with the "Sample merged" option selected, I get a value of 100% for that same point.
However visually the faint gap is still visible.
.....
Samj Portable - Gimp 2.10.28 - Win-10 /64.
Posts: 1,543
Threads: 73
Joined: May 2021
Reputation:
168
Gimp version:
Operating system(s): Linux
03-31-2022, 08:16 AM
(This post was last modified: 03-31-2022, 08:26 AM by PixLab.)
(03-30-2022, 05:58 PM)Krikor Wrote: PixLab, I think you've squeezed it to the limit!
In terms of result and simplicity this method seems to be a winner!
I took advantage of the previous Ofnuts post and examined the faint gap generated by your last method.
In the coordinate X=742, Y=422 I found the following values of Alpha:
18.8% on the top layer and 81.2% on the bottom layer.
If I use the Color Picker with the "Sample merged" option selected, I get a value of 100% for that same point.
However visually the faint gap is still visible.
100% and still having a gap, good to know ![[Image: thumbsup.png]](https://www.gimp-forum.net/images/icons/thumbsup.png)
About squeezing, I did squeeze even more  
In the latest method I did, no need anymore to Select ➤ Grow 1px
Instead, the step of the fuzzy tool put Select By ➤ LCh Lightness , then just delete (all LCh/HSV works but they are a lot more slow)
By doing so it will select also everything between opaque and transparent, thus no need anymore to grow 1px or more 
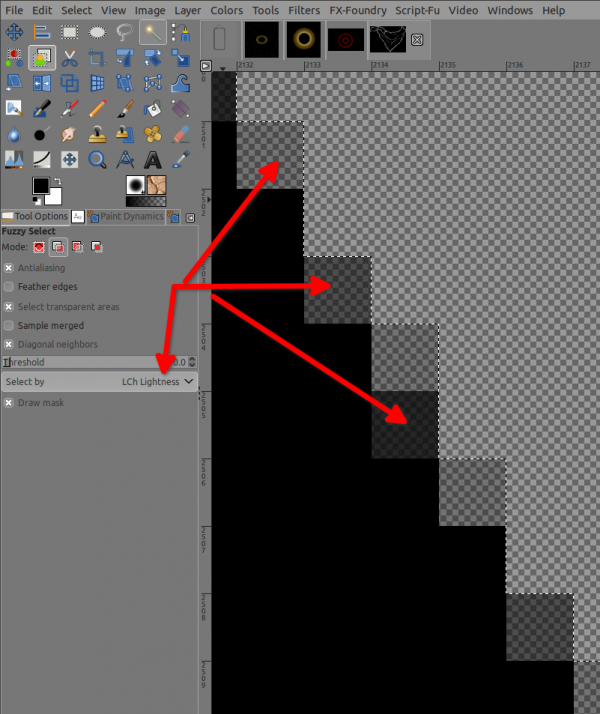
Posts: 1,063
Threads: 88
Joined: Aug 2018
Reputation:
83
Gimp version:
Operating system(s): Windows Vista or 7, 8, 10 (64-bit)
(03-31-2022, 08:16 AM)PixLab Wrote: 100% and still having a gap, good to know ![[Image: thumbsup.png]](https://www.gimp-forum.net/images/icons/thumbsup.png)
About squeezing, I did squeeze even more  
In the latest method I did, no need anymore to Select ➤ Grow 1px
Instead, the step of the fuzzy tool put Select By ➤ LCh Lightness , then just delete (all LCh/HSV works but they are a lot more slow)
By doing so it will select also everything between opaque and transparent, thus no need anymore to grow 1px or more 
PixLab, considering that the outside will be removed anyway, I still prefer the method in your post #23 - ( Select By ➤ LCh Lightness causes some annoying slowness).
Another very simple option that I tested now:
1- With Select by color, select the transparent areas;
2- With the Fuzzy select tool, in the Subtract from selection mode, select the external area;
3- New layer, Select - Grow =3, fill it with black;
4- On the initial layer, alpha for selection;
5- In the new layer, delete (Edit - clear).
BTW:
Considering the topic covered in this thread, I recommend reading: https://www.gimp-forum.net/Thread-Backgr...r-graphics .
.....
Samj Portable - Gimp 2.10.28 - Win-10 /64.
Posts: 1,543
Threads: 73
Joined: May 2021
Reputation:
168
Gimp version:
Operating system(s): Linux
04-02-2022, 05:04 AM
(This post was last modified: 04-02-2022, 05:52 AM by PixLab.)
(03-31-2022, 05:33 PM)Krikor Wrote: PixLab, considering that the outside will be removed anyway, I still prefer the method in your post #23 - (Select By ➤ LCh Lightness causes some annoying slowness).
Agree, post #23 is easier to remember 
(03-31-2022, 05:33 PM)Krikor Wrote: Another very simple option that I tested now:
1- With Select by color, select the transparent areas;
2- With the Fuzzy select tool, in the Subtract from selection mode, select the external area;
3- New layer, Select - Grow =3, fill it with black;
4- On the initial layer, alpha for selection;
5- In the new layer, delete (Edit - clear).
I did try, and I messed the thing up
Result, shortening your method 
1- With Select by color, select the transparent areas; (=> inside and outside is automatically selected)
2- With the Fuzzy select tool, in the Subtract from selection mode, select the external area; (this remove outside areas, keeping only the inner alpha selected)
3- New layer, Fill it with black (I drag and drop from the FG/BG icon). do not grow selection, just as it is.
Done!
Same gap as #23 => almost non existent.
Thanks to your last method, I just told myself if we don't grow we don't need to delete. 
In the end I think we get over complicated, although it was very interesting to see so many methods and searching for the perfect pixel fit, but more I think about it, more I did forget the very basics as it can be as simple as:
1 Fuzzy the transparent inside (the inner alpha)
2 New layer => fill with black

Posts: 1,063
Threads: 88
Joined: Aug 2018
Reputation:
83
Gimp version:
Operating system(s): Windows Vista or 7, 8, 10 (64-bit)
04-03-2022, 12:09 AM
(This post was last modified: 04-03-2022, 12:14 AM by Krikor.)
(04-02-2022, 05:04 AM)PixLab Wrote: In the end I think we get over complicated, although it was very interesting to see so many methods and searching for the perfect pixel fit, but more I think about it, more I did forget the very basics as it can be as simple as:
1 Fuzzy the transparent inside (the inner alpha)
2 New layer => fill with black

PixLab, I totally agree!
The method proposed by Tmanni was stratospheric!
At first I thought the best result would be to avoid the Faint Gap. Fortunately Ofnuts intervened and clarified this issue.
We then have two matters: One is to obtain the inversion of colors, the other; if desired, is to correct this Faint Gap.
So I decided to prolong this topic a little longer :-)
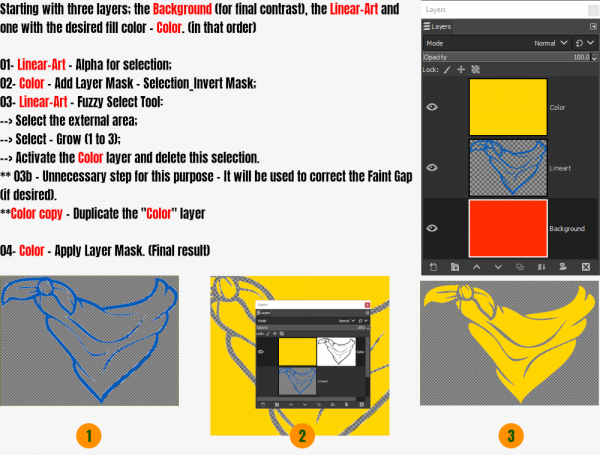 Removing the Faint Gap
A- Make the layers produced in the above steps available in the following order from bottom to top: Background, Color copy, Color and Linear-Art.
B- Select the Color copy layer - Disable the Layer Mask.
C- Disable the visualization of the "Color copy" layer (other layers with active visualization).
D- The Background layer facilitates the visualization of the Faint Gap (Zoom for better visualization).
E- Enable the visualization of the Color copy layer and the Faint Gap will disappear.
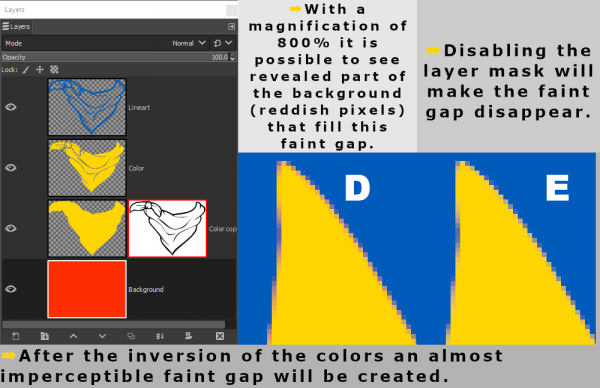
.....
Samj Portable - Gimp 2.10.28 - Win-10 /64.
Posts: 236
Threads: 26
Joined: Mar 2020
Reputation:
29
Gimp version:
Operating system(s): Windows (Vista and later)
I think nobody has suggested using a mask. But perhaps this equivalent to some other method, I don't know.
1. Make a white layer.
2. On top of it, make a black layer.
3. To the black layer, add a white mask.
4. Select the original picture. Press ctrl-C.
5. Select the black layer's mask. Press ctrl-V. Anchor the floating selection.
At this point we have:

What is left to do, is to make the outside regions white. Do as in PixLab's post #23:
6. New from visible.
7. Fuzzy select the outside regions (I used threshold 50).
8. Grow selection by 3 pixels.
9. Delete.
10. Select > None.
11. Make unvisible all other layers except the top layer and the white layer.

Posts: 1,063
Threads: 88
Joined: Aug 2018
Reputation:
83
Gimp version:
Operating system(s): Windows Vista or 7, 8, 10 (64-bit)
(04-04-2022, 03:18 PM)Ottia Tuota Wrote: I think nobody has suggested using a mask. But perhaps this equivalent to some other method, I don't know.
Actually my suggestion in post #28 was just using layer mask.
Perhaps I failed to convey the steps in an easily understandable way - English is not my mother tongue.
But below I go over exactly the same steps as in post #28, just with other words.
1- On top of original picture, make a black layer.
2- To the original picture, Apha to Selection.
3- To the black layer, Add Layer Mask (Selection-Invert Mask).
4- Select the original picture;
- Fuzzy select the outside regions,
- Select - Grow 1 to 3 pixels,
- Close the visibility of this layer.
5- Select the black layer, Delete, Apply Layer Mask.
.....
Samj Portable - Gimp 2.10.28 - Win-10 /64.
|


![[Image: jaZ6k00.jpg]](https://i.imgur.com/jaZ6k00.jpg)

