Thread Rating:
  • 0 Vote(s) - 0 Average
  • 1
  • 2
  • 3
  • 4
  • 5
Replacing background procedure questions
#1
Hello everyone. 
   I recently purchased a book on restoring old photos with Gimp. Good book, learning a lot. 
   However, I've ran into some questions trying to follow the outlined procedure for replacing the background of an image. Yes, I know there are other ways to get the job done. However, getting the job done isn't the point of the exercise. Learning the software is. And to do that, I need to process more input to fix in my mind just what each step is doing.
   If anyone is interested in tackling the questions I have, there is a .txt file attached outlining the procedure with my questions inserted after the puzzling steps.
   Thanks in advance!


Attached Files
.txt   procedure-questions.txt (Size: 3.91 KB / Downloads: 30)
Reply
#2
(03-08-2024, 07:50 PM)Danbor Wrote: Hello everyone. 
   I recently purchased a book on restoring old photos with Gimp. Good book, learning a lot. 
   However, I've ran into some questions trying to follow the outlined procedure for replacing the background of an image. Yes, I know there are other ways to get the job done. However, getting the job done isn't the point of the exercise. Learning the software is. And to do that, I need to process more input to fix in my mind just what each step is doing.
   If anyone is interested in tackling the questions I have, there is a .txt file attached outlining the procedure with my questions inserted after the puzzling steps.
   Thanks in advance!

Hard to see without the image... Anyway, this is how I see it:

-----------------------------------------
7. Cut the Edit Layer to the clipboard (Control + X).
Using the Select By Color tool (Shift + O), click in the
white area of the Edit Layer; make sure the Antialias
box is checked and use a Threshold setting of 8.0.


my 2 cents:
"7. Cut the Edit Layer to the clipboard (Control + X)." is the title to explain what you WILL do, thus first before any Ctrl+X you use the select by color, click on the white area... blablabla, THEN you do a Ctrl+X

----------------------------------------

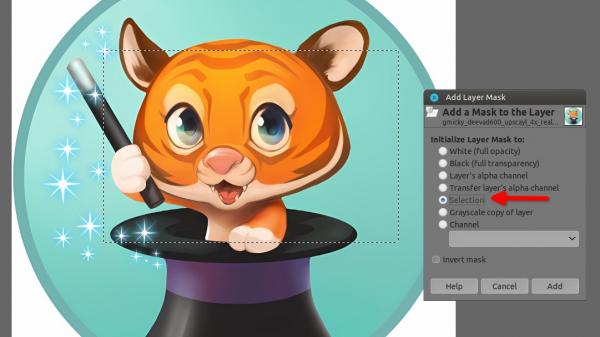
8. Add a layer mask to the background layer copy
(Image Menu ➤ Layer ➤ Mask ➤ Add Layer
Mask). Make the duplicate background layer active
by clicking the preview thumbnail.

  **********************************************

  Which option should be selected to initialize the layer mask to? Should the mask be inverted?

  **********************************************


My 2 cents:
And you said it's a good book.... Angel

Usually by default it's "White (full opacity)", but because you have an active selection maybe the author forgot that part, try by default, Ctrl+Z if not that, try by Selection, Ctrl+Z if not that, re-do those with the "Invert" checked
   

----------------------------------------

9. Copy the subject (Edit ➤ Copy). Click the layer mask
to make it active, and paste the extracted subject
(Control + V). The pixels of the original background
have been made transparent.


my 2 cents:
When you create a layer mask it is automatically selected and ACTIVE, and when you initiate the layer mask with a selection you do not need to "past that selection" again...  As there is nowhere it said Select > None.... once you did select by color at step 7 ➤ thus from step 7 you get that selection all the way to...? Because the author did not tell you to Anchor ➤ which remove the selection....
also I don't understand the back and forth between original BG and Duplicated BG

Now I'm guessing if the author has a proper knowledge of GIMP  Huh  or if that book was written with his toes....

---------------------------------------

Now I don't have the image to see what's going on...

Who's the author of that book? Which version of GIMP author is using, this might affect my 2 cents above if the book is on older version
Patrice
Reply
#3
If you want to remove a background. Make a selection around the area you want to keep, (I use paths to be more accurate, then paths to selection, but you can do it other ways) feather your selection so your edges are not quite so harsh arround your image. 3px for a small image up to 8px for a large image. Making sure you have an alpha channel. Then, invert your selection and delete/clear. You should now have a transparent background. Put a layer of your choice underneath and it will show through the transparent sections of your image.
There is a foreground select in gimp plus the free select tool. Masks and even a interactive one in GMIC-Qt

Smile
Reply
#4
An option is using paths, an example from Ofnuts : https://www.gimp-forum.net/Thread-Partia...with-a-car
Reply
#5
(03-09-2024, 03:09 AM)PixLab Wrote:
(03-08-2024, 07:50 PM)Danbor Wrote: Hello everyone. 
   I recently purchased a book on restoring old photos with Gimp. Good book, learning a lot. 
   However, I've ran into some questions trying to follow the outlined procedure for replacing the background of an image. Yes, I know there are other ways to get the job done. However, getting the job done isn't the point of the exercise. Learning the software is. And to do that, I need to process more input to fix in my mind just what each step is doing.
   If anyone is interested in tackling the questions I have, there is a .txt file attached outlining the procedure with my questions inserted after the puzzling steps.
   Thanks in advance!

Hard to see without the image... Anyway, this is how I see it:

-----------------------------------------
7. Cut the Edit Layer to the clipboard (Control + X).
Using the Select By Color tool (Shift + O), click in the
white area of the Edit Layer; make sure the Antialias
box is checked and use a Threshold setting of 8.0.


my 2 cents:
"7. Cut the Edit Layer to the clipboard (Control + X)." is the title to explain what you WILL do, thus first before any Ctrl+X you use the select by color, click on the white area... blablabla, THEN you do a Ctrl+X

----------------------------------------

8. Add a layer mask to the background layer copy
(Image Menu ➤ Layer ➤ Mask ➤ Add Layer
Mask). Make the duplicate background layer active
by clicking the preview thumbnail.

  **********************************************

  Which option should be selected to initialize the layer mask to? Should the mask be inverted?

  **********************************************


My 2 cents:
And you said it's a good book.... Angel

Usually by default it's "White (full opacity)", but because you have an active selection maybe the author forgot that part, try by default, Ctrl+Z if not that, try by Selection, Ctrl+Z if not that, re-do those with the "Invert" checked


----------------------------------------

9. Copy the subject (Edit ➤ Copy). Click the layer mask
to make it active, and paste the extracted subject
(Control + V). The pixels of the original background
have been made transparent.


my 2 cents:
When you create a layer mask it is automatically selected and ACTIVE, and when you initiate the layer mask with a selection you do not need to "past that selection" again...  As there is nowhere it said Select > None.... once you did select by color at step 7 ➤ thus from step 7 you get that selection all the way to...? Because the author did not tell you to Anchor ➤ which remove the selection....
also I don't understand the back and forth between original BG and Duplicated BG

Now I'm guessing if the author has a proper knowledge of GIMP  Huh  or if that book was written with his toes....

---------------------------------------

Now I don't have the image to see what's going on...

Who's the author of that book? Which version of GIMP author is using, this might affect my 2 cents above if the book is on older version

Thanks for the interpretatation of this set of instructions. Your 2 cents were pretty much spot on and I got it figured out. 
In the authors defense, he offered this method because it helps capture the fine hair around a subjects face better than some other methods.
The book title is "Beginning photo retouching and restoration using GIMP" by Phillip Whitt. He doesn't specify but it appears he's using Gimp 2.10 something.

(03-09-2024, 07:46 AM)sallyanne Wrote: If you want to remove a background. Make a selection around the area you want to keep, (I use paths to be more accurate, then paths to selection, but you can do it other ways) feather your selection so your edges are not quite so harsh arround your image. 3px for a small image up to 8px for a large image. Making sure you have an alpha channel. Then, invert your selection and delete/clear. You should now have a transparent background. Put a layer of your choice underneath and it will show through the transparent sections of your image.
There is a foreground select in gimp plus the free select tool. Masks and even a interactive one in GMIC-Qt

Hi sallyanne. The author suggested using this method as it helps capture more of the fine hair around the subjects face than some other methods. Whether it does or not, I have no opinion. Wink
Reply
#6
(03-10-2024, 10:53 PM)Danbor Wrote: Hi sallyanne. The author suggested using this method as it helps capture more of the fine hair around the subjects face than some other methods. Whether it does or not, I have no opinion. Wink

@Danbor, learning this method using Colors ➤ Threshold to mask, is good it's a "classic" method

A similar method here on gimp-forum > https://www.gimp-forum.net/Thread-Taking...7#pid31237 with screenshots and more options, to fine tune your skills Wink
Patrice
Reply
#7
(03-11-2024, 04:20 AM)PixLab Wrote:
(03-10-2024, 10:53 PM)Danbor Wrote: Hi sallyanne. The author suggested using this method as it helps capture more of the fine hair around the subjects face than some other methods. Whether it does or not, I have no opinion. Wink

@Danbor, learning this method using Colors ➤ Threshold to mask, is good it's a "classic" method

A similar method here on gimp-forum > https://www.gimp-forum.net/Thread-Taking...7#pid31237 with screenshots and more options, to fine tune your skills  Wink

Hello and thanks Pixlab. I'll be checking out that thread as time permits. Wink
Reply


Forum Jump: