Thread Rating:
  • 0 Vote(s) - 0 Average
  • 1
  • 2
  • 3
  • 4
  • 5
color change in the image
#1
Hello

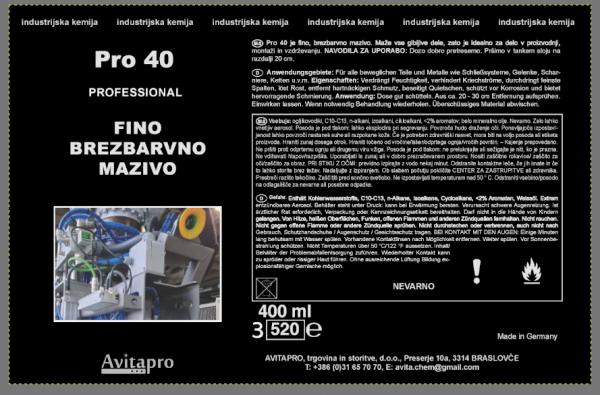
I just got lost. I have no idea how to change an image with text and different background colors to each color individually. Specifically, I want to change the colors in the attached image:

gray to black
red to black
black to white

I really have no idea how.

Please give me instructions.


Attached Files Thumbnail(s)
   
Reply
#2
Specifically, for that image.

1. Colors -> Threshold OK the default setting. Gives a Black-on-White image
2. Colors -> Invert Ok that to give a White-on-Black image.

20 second demo: https://i.imgur.com/DgMAXxR.mp4
Reply
#3
(01-07-2023, 09:40 AM)rich2005 Wrote: Specifically, for that image.

1. Colors -> Threshold OK the default setting.  Gives a Black-on-White image
2.  Colors -> Invert Ok that to give a White-on-Black image.

20 second demo: https://i.imgur.com/DgMAXxR.mp4


Thank you very much. It does what you want. Wink

I would also like to ask you for the whole picture, because I see that there is a problem with the whole picture. I am attaching the whole image where I would like to change the colors in the previous style. I am attaching both pictures. 

https://pasteboard.co/KL0t1U7u7qnb.jpg


Attached Files Thumbnail(s)
   
Reply
#4
Yeah, the full story is often a bit more complicated Wink

One way is use a layer mask. see: https://docs.gimp.org/2.10/en/gimp-layer-mask-add.html and https://www.gimp.org/tutorials/Layer_Masks/ 

Two layers of the same image. Bottom layer is edited to the black / white version Top layer is masked to provide 'windows' to show only the parts needed.  Layer -> Mask -> Add Layer Mask  (from selection)


This is quick and rough, I can just get it into 1 minute demo: https://imgur.com/k0wAXAs.mp4

Note the selection tools are in addition mode. Once you have the layer mask, adjust it with paint tools / more selections
black - hides / white - shows.

If you use a mask and save as a Gimp .xcf file, there is always the opportunity to return at a later date for further editing.
Reply
#5
Great! It works, thank you very much Wink
Reply
#6
Something else is bothering me Wink

Namely, if you look at the picture with a black background where the text is, two lines for some unknown reason seem to be thickened, stand out...

Is there an elegant way to make this even closer to the bulk of the text?
Reply
#7
(01-07-2023, 02:08 PM)njuškalo Wrote: ...snip...two lines for some unknown reason seem to be thickened, stand out...

Is there an elegant way to make this even closer to the bulk of the text?

To be honest, your original image is not too good. The text is without anti-aliasing, the semi-transparent edge pixels which give the impression of smoothness. One benefit is Colors -> Threshold does no damage but it does not make for a wonderful image.

I think the two lines are these, and the original text is bold, so the result is bold.


No real way of fixing that, except by totally replacing the text, using a matching font, (if you can find it)

I did have a quick look around for the original, but could not find anything. If it came from a PDF it might be editable in a PDF editor (not GIMP)
Reply
#8
Maybe to change these two lines a little white to gray? ..but I don't know that either. I'm brand new to GIMP Wink
Reply
#9
(01-07-2023, 03:16 PM)njuškalo Wrote: Maybe to change these two lines a little white to gray? ..but I don't know that either.

Well keep practising and in a couple of years you will be an expert.

1. Select the text
2. Open the colour curves tool Colors -> Curves
3. Pull down the right end of the curve to suit. https://i.imgur.com/6jh0WuY.jpg and OK it
4. Select -> None to close the selection.
Reply
#10
What I tried :
Duplicate the original layer (name it 'org copy')
Duplicate the 'org copy' (name it 'BW')
Use 'Colours / Desturate / Mono Mixer (change value red to 1.80)
Set only layer 'org copy' visible and select the red on the text with the 'Rectangle Select Tool'
Set the layer 'BW' visble and active
Copy the selected and paste it to a new layer : 'Edit / Paste as / New Layer In Place' and name the layer 'BW corr')
Set the layer mode from layer 'BW corr' to 'Multiply' 
Use the opacity to correct the colour equal to the rest of the text colour
Sharpen the layer "BW corr" to optimise the text : 'Filters / Enhance / Sharpen (Unsharp Mask)'
Set selection off : 'Slect / None'
Set layer 'BW'  and layer 'BW corr' visible and make a new layer with 'New from Visible' and name it 'BW fin')
Copy layer 'BW fin' two times and merge the three layers to darken the whole text
Use 'Colours / Levels' to clean the grey pixels out, move the right slider to the left
Duplicate the now corrected layer 'BW fin' 
Invert layer 'BW fin' and name it 'WB'
Copy the colored photo / drawings from the layer 'org copy' to the 'WB' layer
The photo is no problem, select with the 'Rectangle Select Tool'
The other small things you have to select them with different select tools and copy them(bad quality image as Rich mentioned) or you can search an equal pictogram on the internet     
   
Reply


Forum Jump: