| Welcome, Guest |
You have to register before you can post on our site.
|
| Latest Threads |
Requesting testers for CM...
Forum: General questions
Last Post: Malsasa
25 minutes ago
» Replies: 13
» Views: 1,958
|
For the civil (and milita...
Forum: Watercooler
Last Post: Tas_mania
5 hours ago
» Replies: 9
» Views: 6,271
|
It is nice that GIMP exis...
Forum: Watercooler
Last Post: denzjos
9 hours ago
» Replies: 0
» Views: 48
|
XP-Pen tablet works in Pa...
Forum: General questions
Last Post: rich2005
Yesterday, 08:36 PM
» Replies: 1
» Views: 81
|
CMYK conversion
Forum: Other graphics software
Last Post: denzjos
Yesterday, 06:38 AM
» Replies: 0
» Views: 94
|
Need help installing Resy...
Forum: Gimp 2.99 & Gimp 3.0
Last Post: Dave Rove
06-18-2026, 08:44 AM
» Replies: 8
» Views: 7,441
|
Color management and soft...
Forum: Gimp 2.99 & Gimp 3.0
Last Post: Malsasa
06-17-2026, 03:14 PM
» Replies: 5
» Views: 9,877
|
How to restore tool docks...
Forum: General questions
Last Post: rich2005
06-16-2026, 06:40 PM
» Replies: 3
» Views: 697
|
How to change mouse wheel...
Forum: General questions
Last Post: rich2005
06-16-2026, 07:27 AM
» Replies: 9
» Views: 19,130
|
Software-update: Affinity...
Forum: Other graphics software
Last Post: denzjos
06-16-2026, 06:50 AM
» Replies: 0
» Views: 675
|
|
|
| Business Card help |
|
Posted by: nova - 10-12-2022, 10:43 PM - Forum: General questions
- Replies (34)
|
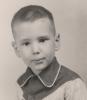 |
[attachment=8835][attachment=8835]Using version 2.10
I'm trying to produce a business card for a WWII veteran.
I have a photo of his medal that I masked off in After Effects that is currently 600x1500. The original medal size was 2400x3000.
I downloaded a business card template and shrunk it down to fit but it looks terrible.
Then I opened both in Gimp and have not been able to figure out how to resize the 600x1500 medal to fit in the template.
There is also text; name, etc. that I used on the After Effects business card version which also looks terrible.
The After Effects forum suggested I can produce a better version in Gimp.
I would greatly appreciate any and all suggestions that will allow me to make this 98 year old Normandy veteran happy.
(by the way, I'm 74 and kind of technically challenged)
Thank you!
|

|
|
| Aligning irregular pictures |
|
Posted by: phipeco - 10-12-2022, 02:24 PM - Forum: General questions
- Replies (11)
|
 |
Hello,
maybe somebody can help me with this: I have non rectangular, polygonal pictures that I need to assemble - like a puzzle, each part roughly fits to the next one. Now what is the easiest way to align the parts for merging? Moving and rotating by hand is quite imprecise and takes a lot of time. Is there maybe a way to mark/use the corners that are supposed to align?
Thanks everybody.
|
|
|
|
| Add selection to layer mask |
|
Posted by: MichaJo - 10-11-2022, 08:51 PM - Forum: General questions
- Replies (4)
|
|
Hi everyone,
i'm a long time user of GIMP.
But this i don't know:
How can i add a selection to an existing layer mask?
How can i subtract a selection from an existing layer mask?
Currently i make "Mask to Selection"
then i add or subtract a selection
then i delete the existing mask
and "Add Layer Mask..." with "Selection"
Second method:
Make an selection while editing the layer mask and bucket fill this selection with white or respectively black.
is there a shorter way such as "Add selection to existing mask" ?
Regards
Michael
|
|
|
|
| Like Photo Stiching but Not Exactly |
|
Posted by: BillPhoto - 10-11-2022, 07:57 PM - Forum: General questions
- Replies (5)
|
|
New to GIMP. Previously used Composite Editor and Photo stitch.
So..Camera on tripod and I take a pix. Subject moves 3 ft right and I take second pix. Move three more feet and take last pix.
Now I have a 3 pix and want to 'blend-layer' them into a GIF. Photos taken outside with woods background. Same light,no wind. Should be simple but can not find any tutorials on this process. Need shot as part of a larger project. Please oh please advise.
And thank you.
|
|
|
|
| How do I get the full toolbox back? |
|
Posted by: RhinoCan - 10-11-2022, 06:48 PM - Forum: General questions
- Replies (2)
|
|
I'm running Gimp 2.10.30 on Windows 10 Home.
I haven't used GIMP very much the last couple of years but used to use it fairly regularly. I'm frustrated to find that I've forgotten something very basic: how do I get the full toolbox that used to come up when I created or edited an image?
If I go to Windows/Toolbox (or simply do a CTRL-B), I get a subset of the full set of tools but I don't get *all* of the tools the way I used to. If I hover over one of the tools in this partial toolbox, it will typically say that it is one of the members of a given family, e.g MyPaintBrushTool will indicate that it is a part of a group with the Pencil tool, the Paintbrush tool etc. but if I try to click on one of the other group members, like Pencil tool, the hover menu just disappears and I don't get the Pencil tool to come up.
Is there some way to get GIMP to display all of the tools in the toolbox, not just one member in each group, or, failing that, to select OTHER members of the group once I've clicked on another member in the same group in the (partial) tool bar?
Just to be clear, when I refer to the "full" toolbox, I'm referring to the one that you see in this short video:
https://www.youtube.com/watch?v=1FOkx4I657A
|
|
|
|
|

![[Image: P1260611-623-623-Coladj-With-Numbers-For...arison.jpg]](https://i.postimg.cc/rF6b1DkM/P1260611-623-623-Coladj-With-Numbers-For-Colour-Comparison.jpg)
