| Welcome, Guest |
You have to register before you can post on our site.
|
| Forum Statistics |
» Members: 5,135
» Latest member: GILDINI
» Forum threads: 7,813
» Forum posts: 42,438
Full Statistics
|
| Latest Threads |
Odd problem with GIMP 3.0...
Forum: General questions
Last Post: cjsmall
5 hours ago
» Replies: 0
» Views: 40
|
Merging a still image and...
Forum: General questions
Last Post: rich2005
Yesterday, 08:35 AM
» Replies: 5
» Views: 264
|
Color picker doesn't refl...
Forum: General questions
Last Post: Scallact
02-19-2026, 06:03 PM
» Replies: 4
» Views: 330
|
Resize image too blurry (...
Forum: General questions
Last Post: rich2005
02-19-2026, 11:30 AM
» Replies: 6
» Views: 286
|
How to change mouse wheel...
Forum: General questions
Last Post: zeuspaul
02-19-2026, 07:56 AM
» Replies: 7
» Views: 15,090
|
Why is the Move tool movi...
Forum: Tutorials and tips
Last Post: kkt
02-18-2026, 09:11 PM
» Replies: 1
» Views: 4,467
|
New contact sheet plugin ...
Forum: Extending the GIMP
Last Post: chuckhenrich
02-18-2026, 02:00 PM
» Replies: 0
» Views: 156
|
Wavelet-decompose doing m...
Forum: General questions
Last Post: rich2005
02-16-2026, 08:33 AM
» Replies: 8
» Views: 4,979
|
Can't load RAW files
Forum: General questions
Last Post: rich2005
02-15-2026, 10:45 AM
» Replies: 4
» Views: 347
|
A selection of old spoof-...
Forum: Gallery
Last Post: TumbleRocks
02-14-2026, 09:30 PM
» Replies: 7
» Views: 8,547
|
|
|
| Can't copy layer mask to another project |
|
Posted by: GMP - 05-27-2021, 10:34 PM - Forum: General questions
- Replies (2)
|
 |
Can I copy a layer mask I have on a pic into another project? When I do it I end up with the original pic with no layer mask.
I have several layer masks of different faces and it would be convenient if I could. Copy them to another project. The only way I can do it is to open the project with the layer mask and delete all the other layers and drag in a new base pic to go with the face, then rename the file.
Any other way to do this?
|

|
|
| Processing RAW w/o demosaic |
|
Posted by: BenjyvC - 05-27-2021, 10:14 PM - Forum: General questions
- Replies (2)
|
 |
Hello,
I work with photogrammetry, am interested to experiment with using separate processes of RAW, the conventional for projecting color to the model and outputting texture maps, the other for scene reconstruction itself. I'm unsure how any SfM engine will deal with an image that hasn't been demosaic'd (or deBayered), but what I stand to gain in improved resolution of the geometry is worth investigating. Can anyone suggest how this might be made to work? Simply the RAW data saved to 16-bit TIFF holds promise. I could then apply sharpening, though I'm unsure if sharpening won't like the Bayer pattern of 2 green pixels for every one red and one blue pixel. I'm reading about pan-sharpening, which accomplishes exactly that, but is part of a commercial package that includes a host of features I don't need, and is a Python scripted thing over cloud-based that probably costs a ton, as it relates to processing global imagery. Many thanks for ideas.
|

|
|
| Rounding corners of a straight-edge path |
|
Posted by: Ottia Tuota - 05-27-2021, 12:19 PM - Forum: Extending the GIMP
- Replies (13)
|
 |
I made a plugin to round path corners. (Again I can't help wondering if I am just re-inventing the wheel. But at least it is a new wheel.) The plugin assumes that the path consists of straight line segments. Example: With default input values the plugin did this:
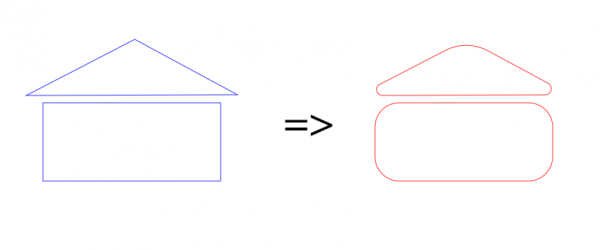
To get the plugin, go to
http://kmarkku.arkku.net/Path_modify_fil...aster.html
scroll to the bottom, and click the right download button. You get a zip file. Unzip it and place the one file it contains (round_path_corners.py) in your user's plug-ins folder. Then (re)start Gimp. To use the plugin: in the Paths tab, right-click a path and follow the links Tools > Modify path > Round corners.
I explain a little about the inputs.
The first input is "Where to set arc ends". It offers two choices: the default is "Use fixed distance from vertices", and the other one I skip now entirely. The value for 'distance' is input in the next field. The picture shows the meaning of "distance":
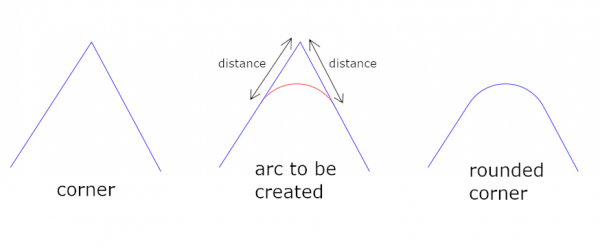
(One fact may cause surprises: In the code it is prohibited that the arc ends could go past the midpoints of the corner legs. The purpose is to avoid that two neighbouring arcs might get mixed up with each other.)
The next input allows the user to choose the shape of the arc. The list of the built-in shapes is:
- circular
- straight
- parabola
- close to vertex
- through vertex
- cusp
In addition, there is a customizable shape about which I talk in a subsequent post; it takes one parameter which is the next input, and I say nothing about that now. The built-in shapes are shown in pictures:
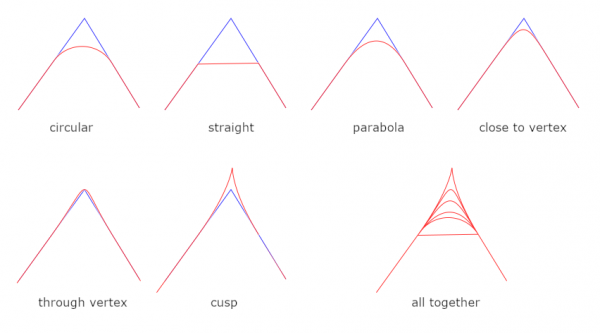
Finally, the last input is "How to use the selection?" which allows the user to make roundings only in some part of the path, keeping the rest untouched (just about). About this I give one example. Suppose you have a path as on the left below. You want to round the corners but want to preserve the long arc. Running the plugin as such would lose the arc (the plugin assumes that the path consists of straight edges and ignores all curvatures). You can protect the long arc as follows: (1) Create a new anchor; (2) make a selection; (3) call the plugin with "Round the corners only inside the selection." The result may be close to what you want, hopefully. (Or maybe not. Some manual tweaking may be needed.)
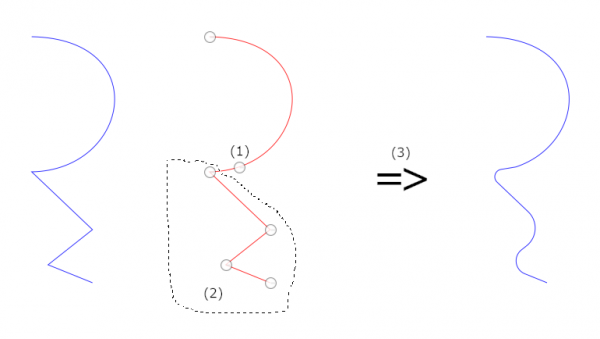
Writing the plugin had complications, as always, and I am not sure that I got everything right. Please tell me if you find the plugin doing anything unruly.
I explain now a little about how the plugin makes the rounding arcs. (I hesitate posting this since hardly anybody wants to read such details, but I think that maybe, just maybe, somebody somewhere will find it useful. And it is easy just to skip it.)
The plugin uses two different algorithms:
- An algorithm to make circular arcs.
- An algorithm customizable with one parameter (this handles all other cases except the circular arcs).
Some words about each. For simplicity, I assume that we are using the option "Use fixed distance...".
Algorithm 1
The algorithm to draw circular arcs is based on the well-known idea. But it is here in a disguise: Instead of a center and central angle, it takes as input a tangent triangle.
Algorithm 2
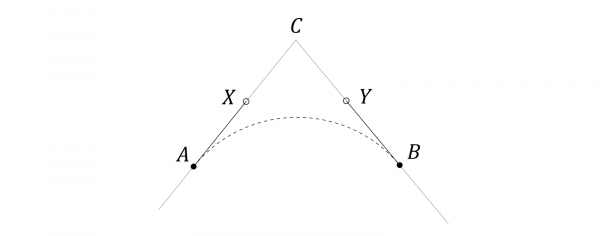
The algorithm customizable with one parameter takes as input one parameter (in addition to the corner and the distance from the vertex). Look at the picture below. It shows how the control points are chosen by the algorithm. First, |AC| = |BC| = distance (the input value). The arc should be drawn from A to B. It is done by control points A,X,Y,B where X and Y are chosen from the legs so that |AX|/|AC| = |BY|/|BC| = parameter. So that is the definition the algorithm uses.
In the GUI of the plugin you may wonder what the numbers in the list of built-in shapes mean:
straight (0)
parabola (2/3)
close to vertex (1)
through vertex (4/3)
cusp (2)
They are the preset parameter values; they are hard-coded in the built-in cases, and with those parameter values the algorithm draws a straight line, a parabola, and so on.
But in addition to these preset values, you may use any custom value: choose the option "one-parametric custom shape" and input some value for the parameter (default is 0.5). For instance, you may want to try arcs flatter than circular but not quite straight; try then parameter=0.3, for example. Any float number can be used, even negative (but not in fractional form unfortunately).
Another example:
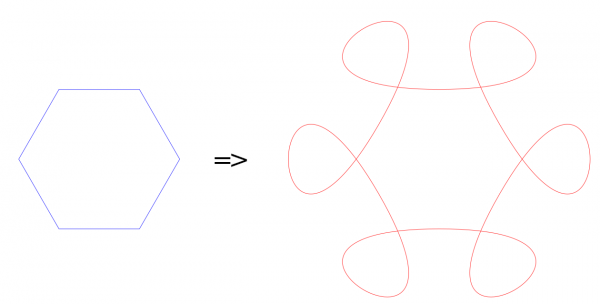
Here the plugin was applied to the hexagon with "Use midpoints of edges" and custom shape with parameter = 6.
Some random thoughts: I am thinking that it might be nice to have more flexibility in determining the shape of the arcs. But on the other hand I think that it would not be worth the trouble. It would mean more parameters and would therefore be difficult to grasp and difficult to use. But if a good scenario for such function could be designed (flexible, versatile, simple, easy to grasp and control - is it possible?) then I think it would be easily added into the plugin. I already had a two-parametric custom shape there. But I dropped it. Too difficult, too little gain.
|

|
|
| Color changes from computer to iphone |
|
Posted by: richiie - 05-26-2021, 06:45 PM - Forum: General questions
- Replies (1)
|
 |
Hey Gimp Family,
Hope you are all doing well. I am editing a couple of pictures for my instagram portfolio. Whenever I export my pictures to my iphone, the colors and saturation looks different than what is on my desktop. Anyone know what I can do to fix this/make a new color profile?
Thanks
|

|
|
|