| Welcome, Guest |
You have to register before you can post on our site.
|
| Latest Threads |
arakne path shapes
Forum: Extending the GIMP
Last Post: rich2005
4 hours ago
» Replies: 2
» Views: 104
|
Selective transparency
Forum: General questions
Last Post: aka
8 hours ago
» Replies: 5
» Views: 201
|
ExifToolGUI and ExifTool ...
Forum: Other graphics software
Last Post: denzjos
02-03-2026, 12:07 PM
» Replies: 12
» Views: 12,868
|
Can you identify effects/...
Forum: General questions
Last Post: rich2005
02-02-2026, 09:34 AM
» Replies: 11
» Views: 721
|
GIMP 3.0.8 Installation
Forum: Windows
Last Post: rich2005
02-01-2026, 08:30 AM
» Replies: 2
» Views: 498
|
Best way to recolor this ...
Forum: General questions
Last Post: rich2005
02-01-2026, 08:25 AM
» Replies: 12
» Views: 985
|
A Search For Missing Belg...
Forum: Watercooler
Last Post: Tas_mania
02-01-2026, 03:18 AM
» Replies: 3
» Views: 1,189
|
eps file won't open
Forum: General questions
Last Post: rich2005
01-30-2026, 09:26 AM
» Replies: 2
» Views: 292
|
undesirable grid
Forum: General questions
Last Post: rich2005
01-29-2026, 12:45 PM
» Replies: 1
» Views: 256
|
GIMP won't start after fr...
Forum: Windows
Last Post: denzjos
01-27-2026, 05:04 PM
» Replies: 2
» Views: 392
|
|
|
| Shift Selection Not Working on Windows |
|
Posted by: EasyGoingPat - 12-18-2023, 08:05 AM - Forum: General questions
- Replies (1)
|
 |
Hi,
I am trying to use the Alignment tool. I have followed the instructions online and can select the first layer okay but am unable to select the next layer. I get the hand icon but SHIFT-select does nothing. I have also tried lots of other key combinations.
I am guessing I am missing something obvious. Is anyone able to help me out?
(Sorry, I know this is a difficult ask without a video to show what's happening.)
Kind wishes - Patrick
|

|
|
| Is it possible to modify guides in script-fu to allow their placement outside canvas? |
|
Posted by: Dogarithm - 12-16-2023, 12:21 AM - Forum: Scripting questions
- Replies (7)
|
 |
Not much to add outside the thread subject line. Heck, you've probably found yourself wondering the same. The reason I'd like to do this, and desperately wish guides could be dragged off-canvas and NOT disappear is all about making vanishing points practical. Otherwise I have to start with a ridiculously huge canvas area to store the exact coordinates of a single pixel's worth of data, as a vanishing point in-file.
As is, I have to work with an order of magnitude or more canvas area than necessary, wasting a lot of space and degrading ergonomics. Does anyone know of any workarounds? Or barring that, know enough script-fu, to describe to me how to place guides that intersect the canvas nowhere, yet still stay in place? I do know basic python but haven't touched script-fu yet.
Makes me miss how in Flash editor, waaay back in the day, you could put anything off-canvas.
![[Image: gimp_vanishing_point_prob.png?ex=658f602...y=lossless]](https://media.discordapp.net/attachments/806607657892708423/1185373539382067270/gimp_vanishing_point_prob.png?ex=658f6022&is=657ceb22&hm=bf8c7ea323f2cc7bc20da6bc1735093a67201b4274adaac52af5b79590048e09&=&format=webp&quality=lossless)
|

|
|
| Picture overwrite |
|
Posted by: alexat35353262 - 12-15-2023, 07:17 PM - Forum: General questions
- Replies (9)
|
 |
Hello, I need help, try to edit some jpg file, and I used overwrite from file and it overwrited the previous jpg file, not the original one, and now I have 2 as same file, how do I recover the lost jpg that was overwrited by second one? Thanks
|

|
|
| Export ALL opened images in GIMP at once with your settings |
|
Posted by: PixLab - 12-15-2023, 08:07 AM - Forum: Extending the GIMP
- No Replies
|
 |
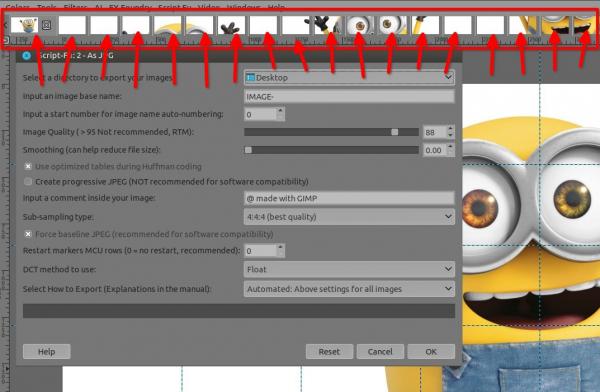
Finally... GIMP's users can have their own settings for each type of image,
and once it's set, every opened images will be exported automatically with these setting.
This script (.scm) is a complete re-start - reconstruction, also it's recommended to remove the older script, it is not mandatory as this script has different declaration, and can coexist with my previous version in GIMP without any problem.
I did found a way for the users to input their settings when they batch export their opened images in GIMP, it's not beautiful as the code is extra long, but it works like a charm, it is very simple and I like simple. 
Purpose?
Batch export all opened images in GIMP with your settings
Example of opened images to batch export all at once with the same JPG settings

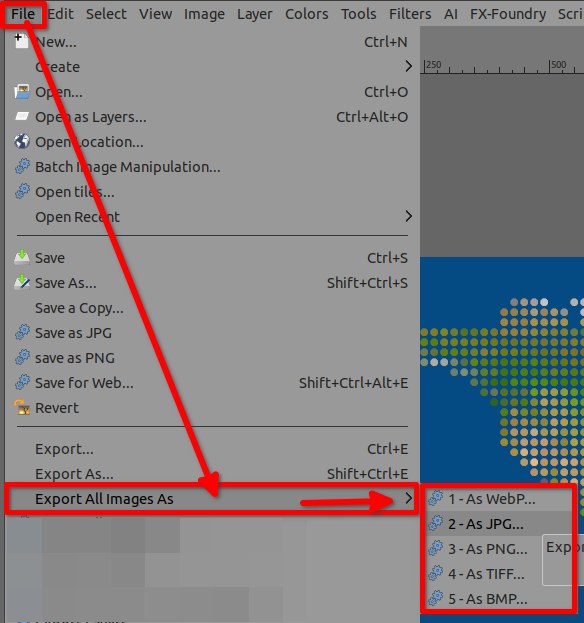
Where to find it in the GIMP's top menu?
There.

Where to Download this gorgeous script, that auto-export all at once?
Here:
 pxl-export-all-images-as-v3.7z (Size: 380.22 KB / Downloads: 1727)
How to install it in GIMP?
A manual-guide is included as PDF when you download the script/plugin, thus RTM 
|

|
|
|