| Welcome, Guest |
You have to register before you can post on our site.
|
| Latest Threads |
.tif Unknown Filetype to ...
Forum: General questions
Last Post: ajax
Yesterday, 02:12 AM
» Replies: 3
» Views: 189
|
Linear color profile not ...
Forum: General questions
Last Post: rich2005
05-10-2026, 08:09 AM
» Replies: 1
» Views: 150
|
Plugins & Scripts not fou...
Forum: General questions
Last Post: rich2005
05-10-2026, 07:45 AM
» Replies: 4
» Views: 323
|
new plugin colour grading...
Forum: Extending the GIMP
Last Post: rich2005
05-08-2026, 08:29 AM
» Replies: 5
» Views: 838
|
ExifToolGUI and ExifTool ...
Forum: Other graphics software
Last Post: denzjos
05-07-2026, 09:07 AM
» Replies: 14
» Views: 17,259
|
Langage français de l'int...
Forum: OSX
Last Post: rich2005
05-06-2026, 07:28 PM
» Replies: 1
» Views: 600
|
Locally Installed Help is...
Forum: General questions
Last Post: rich2005
05-06-2026, 10:10 AM
» Replies: 3
» Views: 825
|
scheme : error in vector
Forum: Extending the GIMP
Last Post: geka
05-06-2026, 05:40 AM
» Replies: 2
» Views: 391
|
Can a plugin be made to s...
Forum: Other graphics software
Last Post: firefox
05-06-2026, 02:23 AM
» Replies: 0
» Views: 162
|
Why does this.......
Forum: Watercooler
Last Post: CmykStudent_
05-05-2026, 08:41 PM
» Replies: 2
» Views: 767
|
|
|
| Make a selection from a path |
|
Posted by: Ultimate Top Trumps - 07-31-2021, 11:10 AM - Forum: General questions
- Replies (2)
|
 |
I am currently using Photoshop with a monthly subscription and love it! The monthly cost of £20, I don't love so much.
I mainly use PS to to edit cards and add them to my website - removed - rich
The process I was using with PS was to scan the cards, open them in PS, straighten the card I want to do first then crop it so I have just that image/card. Next I would use the Pen Tool to round the corners and add the finished image to a larger image.
My question is simple. How do I create a selection from the path for the rounded corners and then delete this, leaving a nicely rounded corner?
Any help would be greatly appreciated!
Thanks in advance!
|

|
|
| Reducing colors |
|
Posted by: yahtzeefish - 07-30-2021, 11:36 PM - Forum: General questions
- Replies (3)
|
 |
Hello,
Is there a good way to reduce the number of colors of my image to only have 4 colors? I was using indexed mode under Image but I was wondering if there was a cleaner way to do it...
See attached!
|

|
|
| Area selected with Fuzzy Selection not shown |
|
Posted by: islegmar - 07-30-2021, 05:13 PM - Forum: General questions
- Replies (4)
|
 |
Hi
I am using Mac with Big Sur and Gimp 2.10.
If I use Fuzzy Selection with the Draw Mask option it works fine: the are selected is indicated with a pink color. The weird think is that when KI release the mouse there is no indication in the image about the selected area, the image looks like before the selection.
But the selection is there because if I do Edit > Clear the selected area is gone.
I have been searching through the different preferences without no success and my installation is pretty new out of the box.
Thanks a lot!!
|

|
|
| Text problem new line |
|
Posted by: PaulCKruger - 07-30-2021, 03:24 PM - Forum: Windows
- Replies (3)
|
 |
For some reason when I enter more than one line of text, pressing to add second line places that above the first instead of below as is should.
Any idea if this is a setting somewhere or a bug?
=== example ===
FIRST WORD (enter for new line ) SECOND WORD
This is what I get:
SECOND WORD
FIRST WORD
Should be:
FIRST WORD
SECOND WORD
|

|
|
| Parametric curves 2 |
|
Posted by: Ottia Tuota - 07-30-2021, 09:04 AM - Forum: Extending the GIMP
- Replies (19)
|
 |
I return to my old love: parametric curves. You may remember that I wrote a plugin to draw parametric curves as Gimp's paths approximately. Now the plugin has a new version. It is so big overhaul that I prefer to start a new thread. I wish everybody would just forget the old one.
The new version 2.1 has a new approximation algorithm. Meanwhile I have learned something about plugin writing, and I also had my eye on how the extension Parametric Curves is done in Inkscape, and I hope that I now managed to make my plugin a little more user-friendly. Anyway, it is no longer so loaded with options nobody wants.
If you have in your plugins folder files 'parametric_curves.py' and 'simple_parametric_curve.py', please delete those. To get the new version (2.1), click the link
http://kmarkku.arkku.net/Parametric_curv...aster.html
scroll down and download the file for Parametric curves; this gives you the .zip file parametric_curves_2_1.zip. (There is another download button for Special curves, an update of an old version, but I talk now only about the Parametric curves.)
The .zip file parametric_curves_2_1.zip contains one file parametric_curve.py and a small file doc.pdf. When you unzip the .zip file and move the .py file to your user's plug-ins folder, and restart Gimp, you find in the menu at
Filters > Render > Parametric curves
three plugins:
- Parametric curve (cartesian)
- Parametric curve (polar)
- Parametric curve (read function from file)
The documentation file doc.pdf contains explanations and instructions. They are probably useful only if you try the third plugin. Otherwise you don't lose much if you skip the documentation and just go experimenting.
The first plugin is the basic form, and I talk only about that in this post. The other two I shall explain later.
Open the first plugin Parametric curve (cartesian). If you let the default values in the GUI be as they are and just press OK, you get a half circle, as large as can be fitted on the screen. I don't show it here: you know what a half circle is.
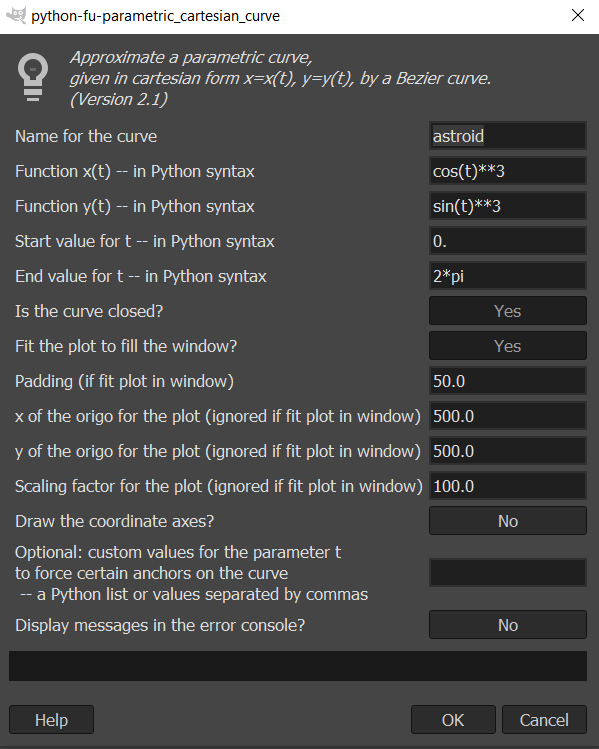
To get a better example, put in the GUI the following:

Changes from the defaults are:
name = astroid
x(t) = cos(t)**3
y(t) = sin(t)**3
start value for t = 0 (this is the same as default)
end value for t = 2*pi
the curve is closed
padding = 50
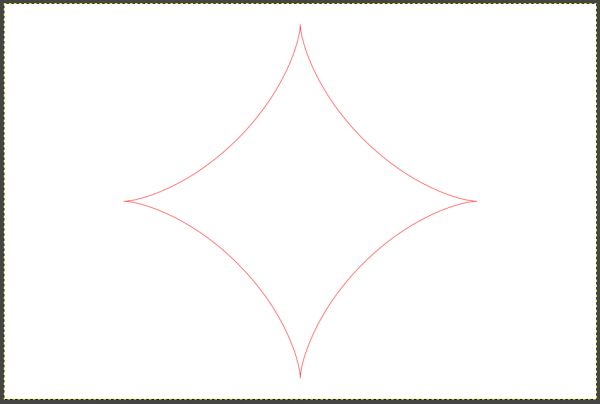
Then on the screen you get an astroid, fitted to fill the screen with a little padding. And it is a path, so all stroking is left to the user.

That is the idea. If you keep 'fit to window' as Yes, you get as large a curve as fits on the screen and the next field enables you to put some padding. But clicking 'fit to window' to No, you can control the size and placement with the three inputs 'x of the origo', 'y of the origo' and 'scale'.
<...skip on first reading...>
There is one input which you can usually safely just ignore: custom parameter values. But I explain the idea for once: Consider the astroid example. There are four cusps. The plugin puts one anchor at each cusp. Those anchors should be set rather precisely to obtain a faithful rendering of the astroid. But how does the plugin find the cusps? It cannot compute derivatives (which would bring the problem down to solving equations). No, the only thing it can do is to run along the curve and examine it at very many close points. That is what it does and that is how it finds cusps (or inflection points or whatever). You understand that that is necessarily inaccurate. So, the idea in those custom points is that the user can help the plugin in its work. The user can list the parameter values (pi/2, pi, 3*pi/2) which give three of the cusps (the fourth is the starting or ending value of t, so the plugin knows it anyway). When the plugin is given those exact parameter values it places anchors at those exact spots and the result will be more accurate.
But in its current form the plugin is so good in finding cusps on its own (or inflection points or whatever) that you can usually ignore this difficulty. But it is good to know just in case: with custom points you can force the plugin to place anchors at some particular points. Then those points will be exactly on the right curve. Between the anchors the curve will only approximate the true curve.
</...skip on first reading...>
You may recall that the goal of this plugin is: Given a parametric curve,
1. approximate it with a path (a composite Bezier curve);
2. try to do this very accurately; and
3. do this with only a small number of control points.
Requirements 2 and 3 are contradictory, but at the moment I am rather pleased with how the plugin works.
If you try the plugin with complicated curves you are likely to find trouble cases where something goes wrong. I shall be grateful if you report those: the functions, the interval, custom points (if any), and any error messages.
|

|
|
| Erase problems |
|
Posted by: Robert Foster - 07-29-2021, 03:13 PM - Forum: General questions
- Replies (6)
|
 |
Hi I am new to this forum but not new to Gimp.
I do a lot of blending photos and recently I am having issue with erasing. All my older image projects still work fine, but when every I input newer photos as an original project or on top of an older project. Well they won't erase properly. What is happing is erase seems to be getting replaced by a color and this has completely stopped my work flow.
Mac/OS Big Sur 11.4
Gimp 2.10
|

|
|
| Programmatically change text |
|
Posted by: DontCallMeLarry - 07-27-2021, 08:04 PM - Forum: General questions
- Replies (3)
|
 |
Hi,
I'm trying to figure out how to programmatically change text in a layer and then save the output?
My use case is trying to add a version number (aka limited edition) to a digital photograph. I would like to do this 100 times and have an end result of 100 images that have a minor change of 1/100, 2/100, ... 100/100.
Thank you for the help or suggestions!
|

|
|
| Making images with 300 dpi |
|
Posted by: snowforest - 07-27-2021, 08:37 AM - Forum: General questions
- Replies (15)
|
 |
The images draw with librecad, when I export it as jpg, it only exports with 96 dpi. But I need 300 dpi. I turn it into 300 dpi using gimp. What do you suggest? Is gimp the best one to do it or another software or it doesnt matter? I use windows 10.
|

|
|
|